Fire and silver: Tricks of the trade from a bench jeweller
By Virginia Muralt
For many starting out in the craft of jewellery fabrication and goldsmithing, sterling silver (or 925 silver) serves as the jumping off point into the world of working with precious materials and metals. A large component of jewellery fabrication requires the skills of soldering, annealing, and torch techniques. While this can be intimidating, getting to know your torch and discovering how to work with sterling silver can be your best friend and, ultimately, one of the most useful tools at your work bench.
What is soldering?
In the simplest of terms, soldering is the process of joining two metals together by melting an alloy of metal with a lower melting point as a joiner (solder).
To create silver solder, it is alloyed with fine silver, copper, and zinc. The percentage of each depends on the type of solder you are working with. Zinc within the alloy is used to manipulate the melting point of the solder. The more zinc, the lower the melting point.
For example, ‘extra easy’ solder consists of 56 per cent fine silver, 22 per cent copper, and 17 per cent zinc; ‘hard’ solder is 75 per cent fine silver, 22 per cent copper, and three per cent zinc.
Common soldering issues
Sterling silver oxidization
Given sterling silver contains copper, the metal tends to oxidize, which, typically, turns its colour from white to dull grey or black over time. These areas of discolouration are often apparent on soldering lines and places where the most heat was applied.
Many things can cause sterling silver to oxidize, including the pH balance of the person handling the metal (more acidity means more oxidization or discolouration), exposure to ammonia or bleach, hard water, or its normal day-to-day environment. Surface oxidization can be removed simply with a polishing cloth. (For this reason, it is wise to include a jewellery care sheet, as well as an anti-tarnish strip or polishing cloth with your work, as this can help prevent angry customers who have oxidized jewellery.)
Another trick to get your sterling silver clean and free of surface oxides is combining a mixture of equal parts salt and baking soda in aluminum foil and pouring in boiling water. From there, it is as simple as placing your sterling pieces into the mix and watching the ion exchange magic happen. (This technique is only recommended for jewellery pieces that do not contain stones or pearls, as boiling water might heat shock and fracture certain gemstones.)
Firescale
Firescale has been the bane of many jewellers’ soldering experiences, especially for beginners. It often shows up after you have done your final polishing rounds—you have your beautiful piece, all shined and ready to hit the market table, when you notice a dark smudge (Figure 1). Unfortunately, you realize this smudge is not surface oxidization and cannot be buffed off by a polishing cloth.
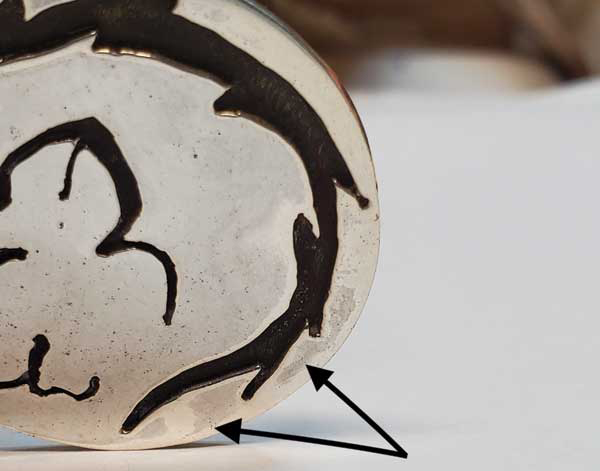
Indeed, unlike surface oxidization, firescale occurs deeper within sterling silver. It happens when the metal is heated or overheated for long periods of time and oxygen gets the chance to oxidize the alloys within sterling silver. This leaves a dark purple smudge within your piece and a whole lot of frustration for you.
Identifying firescale
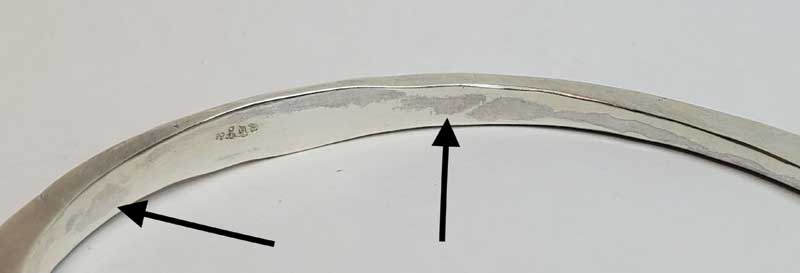
A good way to check for firescale on a piece of sterling silver, fully polished or not, is to place it on a piece of blank white paper in a well-lit room. The reflection of the white should help the pesky firescale pop as a dark purple discolouration on your silver piece (Figure 2).
Unfortunately, once you have the dreaded mark of firescale, there isn’t an easy fix. The only solution is going back to the sanding stage to thoroughly sand the metal and polish it off. Depending on how deep it is, this may take several attempts.
Preventative measures
While there is no easy fix for firescale, there are methods to stop it before it starts (or, at the very least, ways to help reduce the labour needed to remove it).
-
Charcoal block
Soldering with a charcoal block can greatly reduce the amount of oxidization in sterling silver pieces. As a charcoal block is heated, oxygen is removed from around the piece (also called a reducing atmosphere effect). With little to no oxygen, the alloys inside sterling silver do not have the chance to oxidize. Charcoal blocks are also recommended for annealing and soldering large pieces, as it reflects heat back onto the piece and decreases the amount of time it takes to anneal or flow solder.
-
Borax/Boric acid and alcohol
Coating pieces with a mixture of borax or boric acid and isopropyl alcohol prior to soldering or heating creates a protective barrier, which can help prevent firescale. While you may need some more pickling time to remove hardened borax, this trick is helpful, as it can save you a headache down the line. This technique also works for other precious metals to help prevent oxidization when heating. Similarly, you can also try using a self-pickling flux to help keep your firescale and oxidization down.
-
Always pickle
After heating or soldering, ensure your piece is thoroughly pickled in an acid-pickle to remove as much surface oxidization as possible and, in turn, help cut down the amount of time you spend dealing with firescale.
Pits
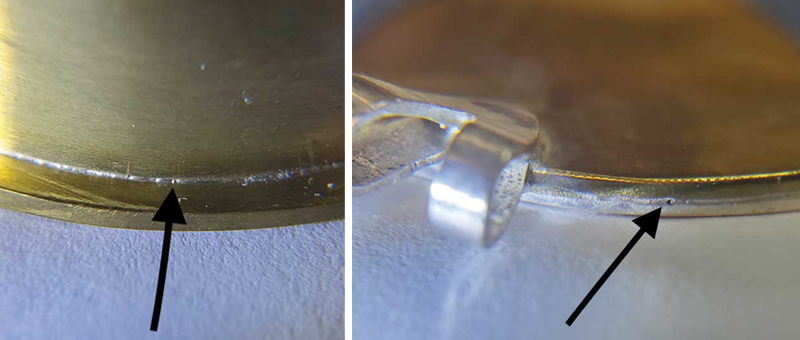
‘Pits’ show up within your solder seam as sunken holes instead of a nice clean line (Figures 3 and 4). When silver solder is overheated and rises past its boiling point during the soldering process, the zinc used to control the flow temperature of the solder burns away, leaving annoying little pits. Further, since the zinc is being burnt away, the melting temperature of the solder gradually rises, making it even harder to get a good seam.
When this happens, the best option is to stop before you accidently melt part of your beautiful masterpiece. Take a break, pickle/clean off all the oxidization and flux, and try again with fresh solder.
Solder not flowing
In situations where solder is being stubborn and doesn’t seem to want to flow, a few contributing factors could be at play.
One of the most common is the metal is dirty. Oils from your hands, polishing products, or old flux from previous soldering work can hinder the flow of solder. This is another great reason to use boric acid and alcohol (cleaning the metal of any oils) and pickle your piece thoroughly before soldering (removing leftover flux or oxidization).
The type of flame used may also cause solder not to flow. Using the appropriate size of flame for your piece and knowing ‘how hot is too hot’ can help when soldering or annealing—indeed, this can be the difference between success and chaos! When it comes to soldering sterling silver, the entire piece must be heated evenly throughout to get solder to flow nicely. Start by heating the whole piece to annealing temperature, then focus on the specific soldering area and alternate between those two until you see your solder flow. (Keep in mind, though, a harsh and pointed flame will result in pointed firescale in the places where heat is focused the most. Be sure to choose a flame bushy enough to evenly heat the piece without scorching the metal.)
Annealing
When working with sterling silver, you may notice it progressively gets hard to bend or shape—it may even snap or crack if pushed too hard. This is because sterling silver gets ‘work hardened.’ As you bend, hammer, and manipulate sterling silver, the molecules within the metal get condensed, which doesn’t allow for very much movement or flexibility over time.
To return the sterling silver to a more workable state, you must rearrange the metal molecules back into a uniform shape that is flexible. This can be done by evenly heating the silver to its annealing temperature (1100 F/593 C) and immediately quenching it in water. From there, place it in a pickle-acid solution to get rid of surface oxides and any leftover products on the piece.
Similar to heat control with soldering, knowing when your piece of sterling is at the correct annealing temperature can help with eliminating firescale and prevent scorching a piece.
How will I know it’s annealed?
Colour change
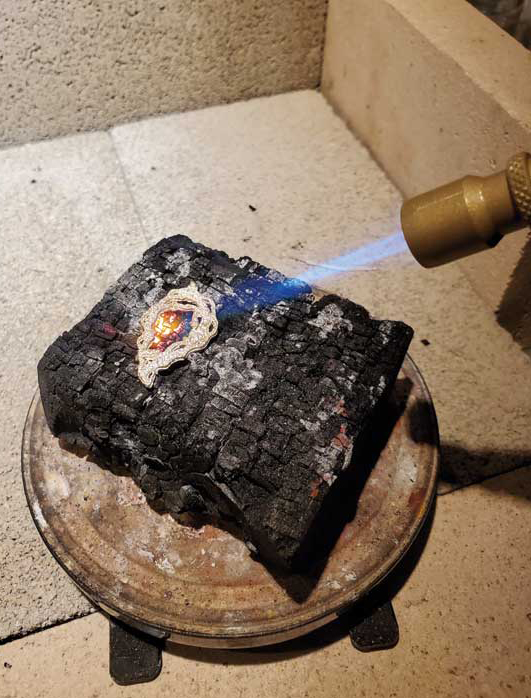
As you heat sterling silver, the surface of the metal changes colour with the raising temperatures. When annealing, it is best to use a large ‘bushy’ flame and a charcoal block, as this heats the entire piece evenly, quickly, and with minimal oxidization as possible.
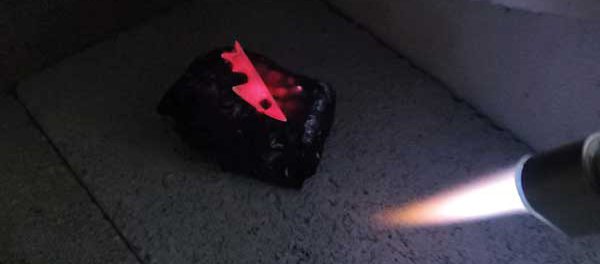
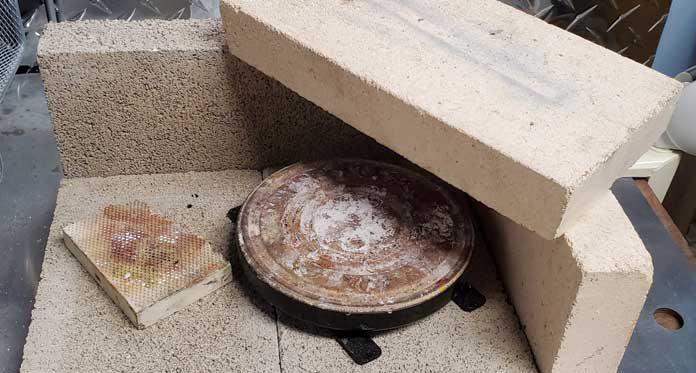
When the sterling silver piece reaches a dull red colour, immediately quench it in water—you should hear a satisfying sizzle as the metal hits the water. The longer you hold the dull red colour, the closer you approach the melting point of sterling silver. Fortunately, this is a fairly forgiving metal, and it will give you plenty of colour warning before it melts. If you see cherry red (Figure 5), stop! If you continue, your beautiful masterpiece will become a beautiful lump of silver. To help spot colour change, try dimming the lights slightly or covering/shadowing the soldering area with a spare fire brick (Figure 6).
Disappearing permanent marker
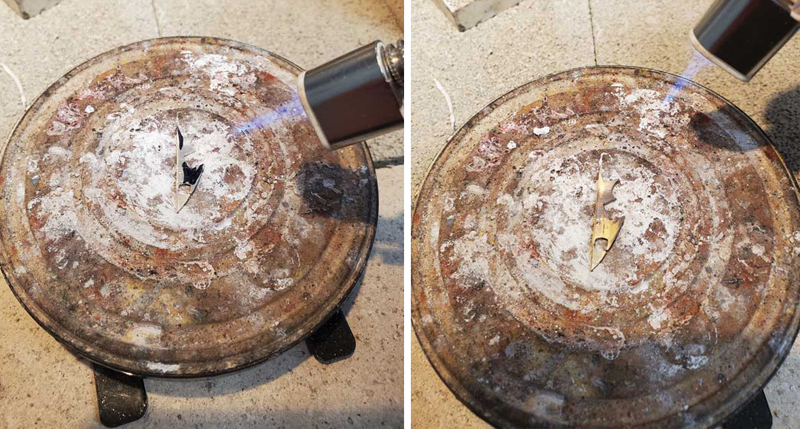
The ‘permanent marker’ trick is a useful technique for determining when your piece of sterling silver is at the correct annealing temperature (Figure 7). Using a permanent marker, mark the metal in several places (including the thickest and thinnest parts of the metal). When heating your sterling, the permanent marker will fade as the metal approaches the annealed temperature. When it disappears, this signals the piece is fully annealed.
Paste flux
Using paste flux can also provide visual reference that sterling silver is annealed. Similar to the permanent marker trick, place some paste flux on the thickest and thinnest part of a piece. When annealed temperature has been reached, the flux will turn glassy and clear, signalling the sterling silver is annealed.
Go forth, safely
Of course, before sparking up a flame and playing with fire to try out these tips and tricks, be sure to don the appropriate personal protective equipment (PPE), including safety glasses, hair ties, and, if needed, a mask. Additionally, ensure your soldering area is well-ventilated and keep a fire extinguisher within reach.
Whether it is your first time picking up a torch or your hundredth, soldering and heating sterling silver is a valuable tool of the jewellery trade. These tips will, hopefully, make the journey of creation a little bit easier. Don’t let the firescale and oxidization get you down!
 Virginia Muralt found her passion for jewellery creation and design in 2015 while completing her jewellery certificate at Fleming College in Peterborough, Ont. To further her knowledge and skills in the field, she attended the jewellery arts program at George Brown College, graduating in 2019. Most recently, Muralt won second place for Canada in the 2021 DeBeers Shining Light Awards, an international competition for young emerging jewellery designers.
References
Knuth, B. G. (2000). Jeweler’s resource: A reference of gems, metals, formulas, and terminology for Jewelers. Jewelers Press.
McCreight, T. (2004). Complete metalsmith. Brynmorgen Press.
Sign up for our newsletter
Get all the latest news and features from Jewellery Business. Submit your email below to get our twice-monthly newsletter.

Read the Latest Issue
