Back to basics: Tips on re-tips
by charlene_voisin | June 1, 2012 9:00 am
By Tom Weishaar
 [1]
[1]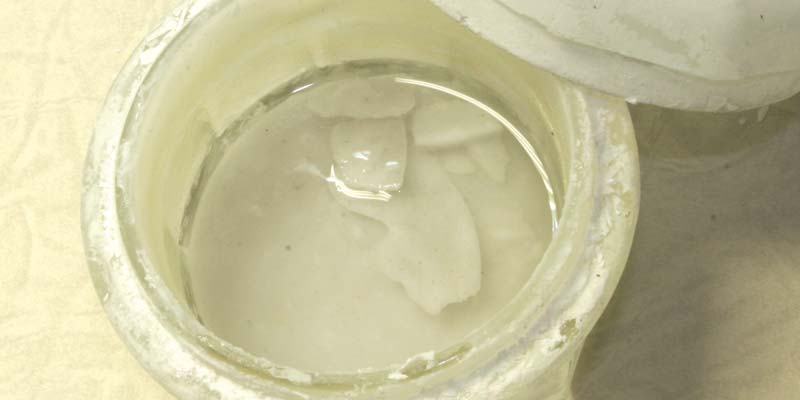 [2]
[2]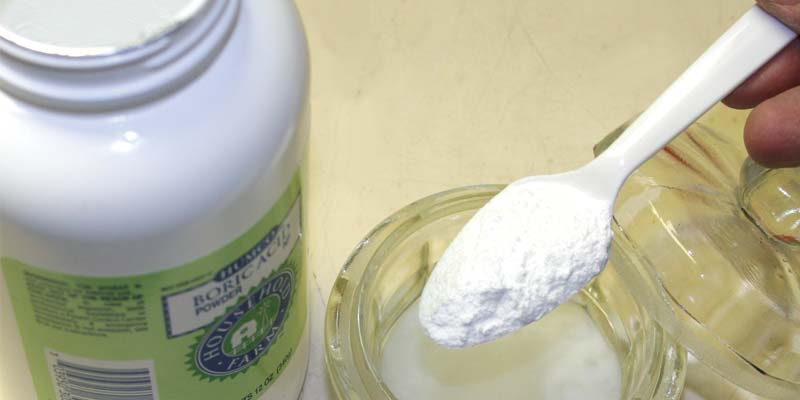 [3]
[3]


Editor’s Note: This is the third installment in a six-part series that aims to break bad habits and do away with shortcuts bench jewellers often pick up. This time, we turn our attention to re-tipping versus reconstructing.
One of my personal heroes is Mike Holmes, the home repair guru whose television program, Holmes on Homes, depicts poor renovation projects he makes right for the homeowner. Mike has made a name for himself in Canada, both among the general public and in construction circles. His following in the United States is equally impressive.
You might wonder why I would make a connection between Mike Holmes and an article about re-tipping prongs. The answer is because re-tipping and reconstructing prongs are the most common repair jobs done by bench jewellers. They are also the two tasks most frequently done wrong. As Mike Holmes would say, “This is unacceptable.”
The oddity about re-tipping is it ranks among the most profitable of all repair jobs. Think of it this way—a prong usually needs to be re-tipped approximately every 10 years. There are literally millions of worn out prongs just waiting to be re-tipped at an average cost of about $15 to $20 each. No need to do the math. The answer is quite clear. From a purely financial point of view, a bench jeweller could make a lot of money if all they did was re-tip prongs and were really good at it.
That said, why is this particular repair so commonly abused? Perhaps the answer lies solely in its everyday nature. Has re-tipping become mundane, boring, not worth our time? Is this why so many bench jewellers look for shortcuts when it comes to re-tipping? What the jewellery industry needs is a Mike Holmes.
Before we go any further, I must caution you to check the condition of your boric acid solution. I’ve mentioned before this material is a deoxidizer, meaning it prevents oxygen molecules from attacking metal being soldered. In a high-oxygen environment, diamonds begin to burn or ‘frost’ at 700 C (1292 F); at lower oxygen levels, significant burning occurs at 850 C (1562 F). Boric acid coats diamonds and seals off oxygen attack. It is the only thing protecting stones during re-tipping. If you’re using old boric acid that is crystallized like the solution in the second and third photos above, it needs to be changed. Remember, the beneficial effects of boric acid are burned away in one to two minutes upon applying heat.
Torch re-tipping versus laser welding
 [4]
[4]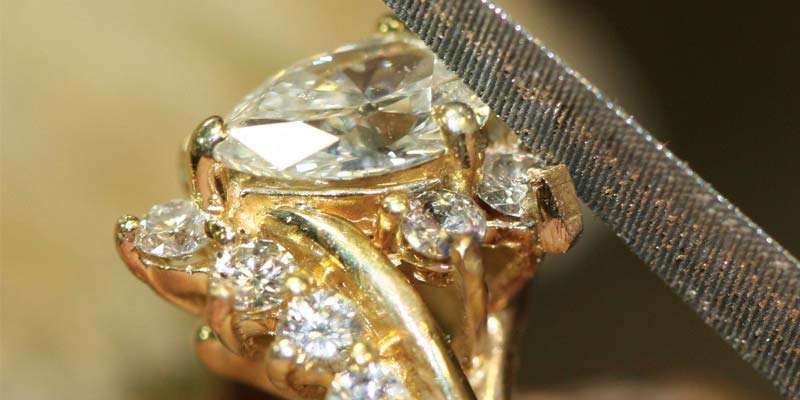 [5]
[5]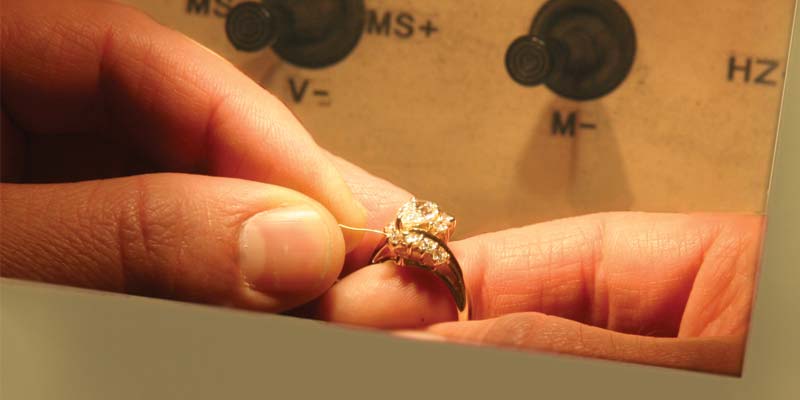 [6]
[6]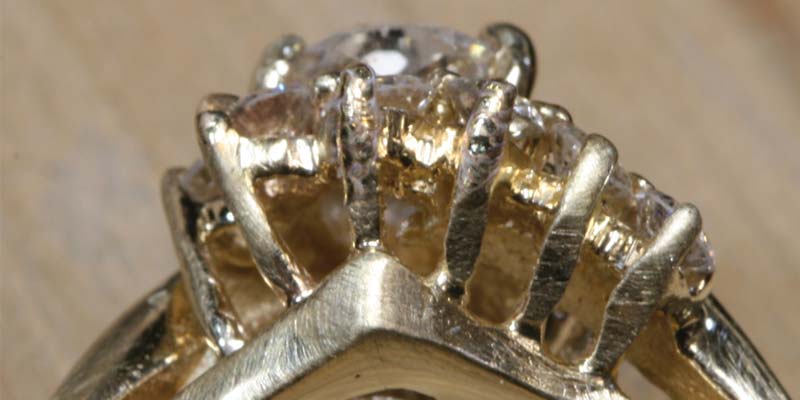 [7]
[7]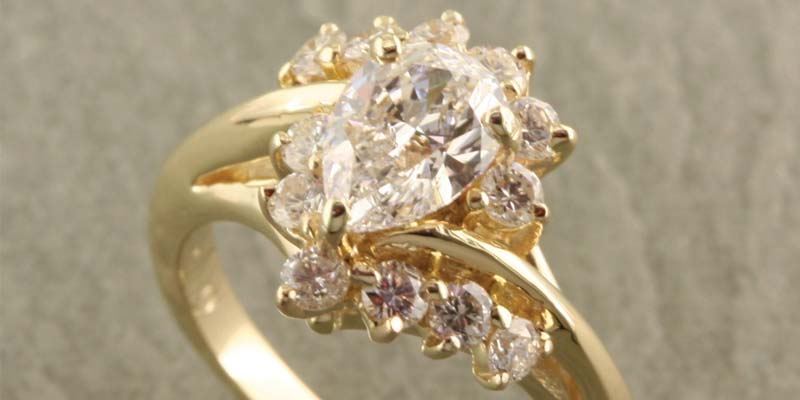 [8]
[8]


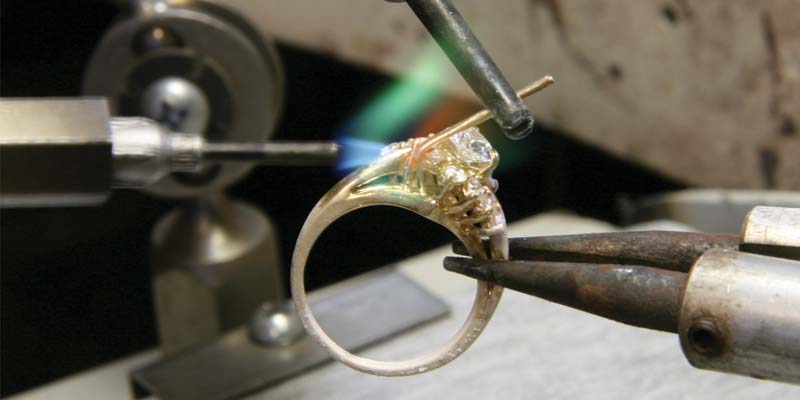
I became a bench jeweller in the dark ages, when laser welders were not part of the landscape. (Okay, I’m exaggerating to make a point.) Back then, one of our main concerns was ‘fixturing’ the piece we were working on. The tool in the first photo above has two tweezer arms and works great for holding a ring in one and a wire in the other. When re-tipping a ring with a gallery, I bend the new prong wire so that it wraps around the worn out prong. This way, I can build it up below the girdle line, as well as on top of the stone.
When re-tipping, I always use a good-quality hard solder. An easy-flow solder pits more easily and tends to run into areas where it shouldn’t. Since the ring in our example was originally cast and has no previous solder seam, I was able to use 14-kart hard plumb solder.
Re-tipping a prong with solder only rather than also adding new metal, is a huge mistake. Doing so creates a weak—and often pitted—prong. It is a sure sign of poor craftsmanship and is unacceptable.
A prong re-tipped using a torch requires time and effort to become a thing of beauty. The wire I soldered onto this prong was larger than needed, so the excess metal will need to be filed down to the correct size. The trick to a great re-tipping job is to blend the new metal into the old prong and make it look like a whole new piece. When re-tipping using a torch, I can generally do five to six prongs in an hour’s time and maintain a high level of quality.
To provide an example for this article, I re-tipped half the prongs on this same ring using a laser welder. The difference is phenomenal. A laser welder is a fantastic tool for re-tipping, as you can add metal with pinpoint accuracy. When working on a rounded prong, I expand the laser beam’s diameter and diminish its voltage, lessening the unsightly dimpling normal to a laser weld.
The front prong seen in the photo in the top left has been completely rebuilt using a laser. For comparison’s sake, I only repaired the tip on the right side and still have a bit of work to do in the lower gallery area of this prong. With a laser, you can actually shape the metal as it is being added. This greatly reduces the amount of metal used and speeds up the time needed to blend and shape the new prong. I can also re-tip twice as many prongs in the time it would take to torch-solder them. At our store, we charge the same for laser or torch re-tipping. The extra profit from the laser goes to pay for the machine.
As you can see in the last photo above, the end result turned out well. The new prong tips are all blended as they should be and appear as if they were original to the piece. The front side of the ring was re-tipped using a laser welder, while the prongs on the far side were all torch re-tipped. Regardless of the tool used, the outcome should be the same.
Re-tipping on larger diamonds
 [9]
[9]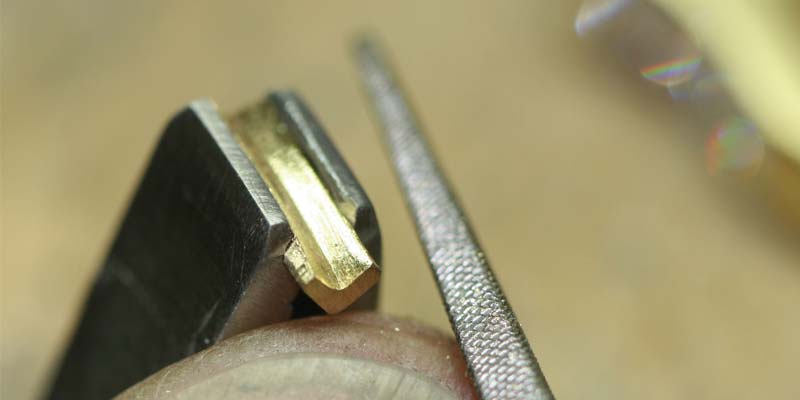 [10]
[10]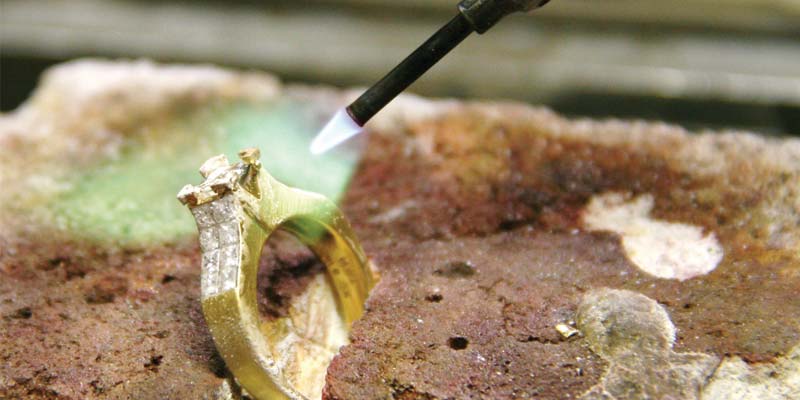 [11]
[11]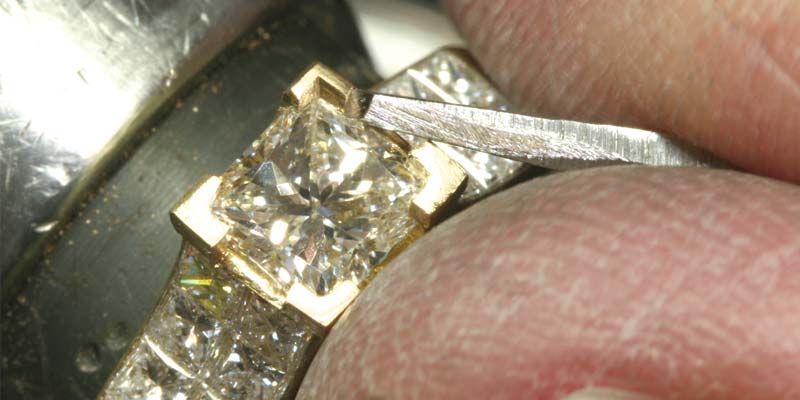 [12]
[12]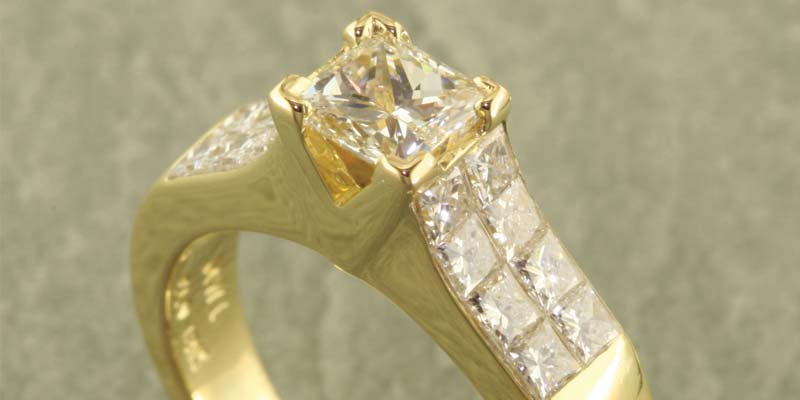 [13]
[13]


The 18-karat yellow gold ring in the photos above with its one-carat centre diamond recently came into the shop for re-tipping. This piece is approximately 10 years old and is right on schedule for re-tipping. The corners of the chevron prongs are worn away and the stone’s edges are poking through. On a job like this one, one might be very tempted to use a laser to build up the prongs; it certainly would be faster. However, I think doing so would be a big mistake. The potential for damaging this stone with a laser is too great. I prefer to use the conventional torch re-tipping methods.
To re-tip over chevron prongs, I’ll need to create tips out of gold stock. For this particular job, I started with a 6-mm length of square stock and filed it into a long chevron-shaped prong. The stock was then cross-sawn into four equal lengths to make the new prongs. There should be no shortcuts to a job like this. This repair is difficult and time-consuming. It’s understandable why bench jewellers would be tempted to take the easy road out and use a laser welder. However, the risk of damaging this expensive stone is too great. As bench jewellers, we should want to do the job correctly, as this is the reason we chose this profession. Personally, I find it very satisfying to do a job well.
I have to confess I broke my own rule about not using a laser on a job like this one, but like all rules, there’s an exception. I used the laser welder to tack the new prong tips in place and was careful to do so in an area where there was no chance of hitting the diamond, even if the laser beam were to ricochet, as it is often apt to do.
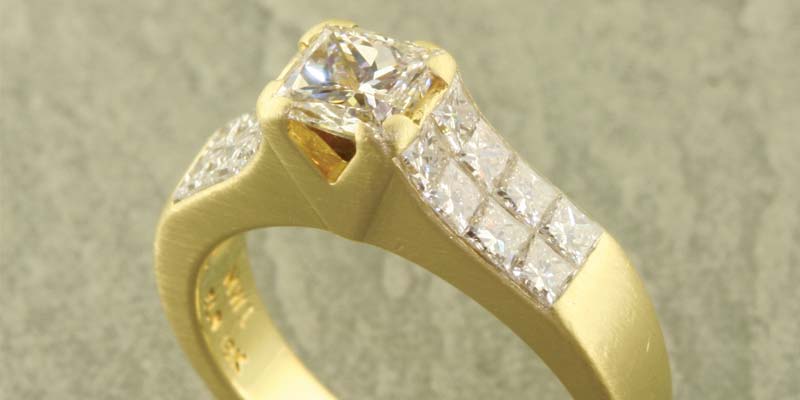
This ring contains 16 invisible-set princess-cut stones. Working with invisible settings can be problematic, so solder choice might be an issue. As this ring has never been repaired, I chose 18-karat hard plumb solder because of its resistance to pitting. An argument can easily be made to drop down to a medium or easy-flow solder to avoid undo risk of something shifting in the invisible sets. Questions like this are personal calls made by the jeweller on a case-by-case basis. Please remember that boric acid solution only protects diamonds from heat for a short time. For this job, I soldered two prongs, cleaned the ring in pickle and sonic, and reapplied the boric acid before continuing.
For me, finish work is a bench jeweller’s signature. Unfortunately, it’s another area where jewellers often take shortcuts. Personally, I consider this the best part of my job! I have a separate set of gravers used just for working around stones. These gravers are neither sharpened as finely as my engraving gravers nor are they polished. The photo to the left illustrates me using a flat graver to detail out one of the corner chevron prongs. After finishing all four prongs, they required only a light touch of the buffing wheel.
Re-tipping is another area where bench jewellers need to price out jobs separately. This one took one hour and 15 minutes to re-tip four chevrons prongs. In addition, these prongs are thicker than regular ones, so material costs are higher. Further, this ring is 18-karat gold, not 14-karat. I priced this job at $45 per prong.
Reconstructing prongs
 [14]
[14]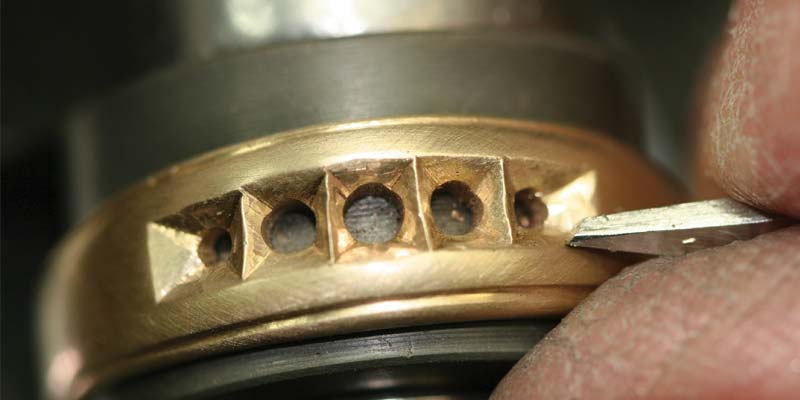 [15]
[15]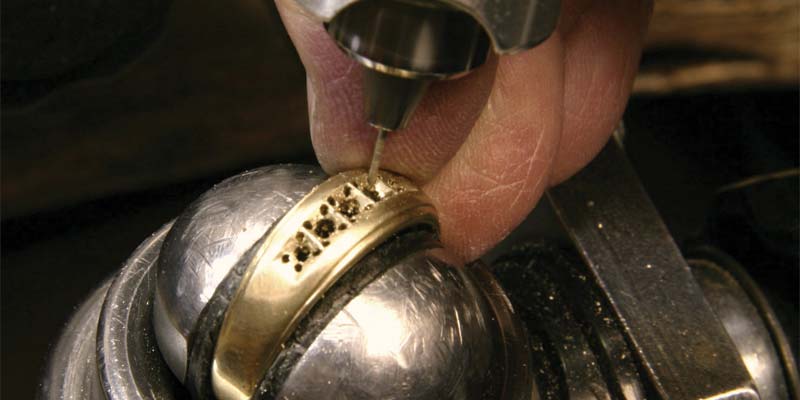 [16]
[16]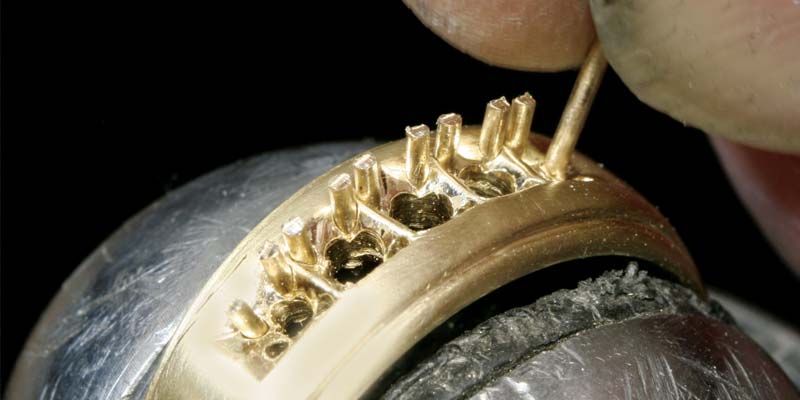 [17]
[17]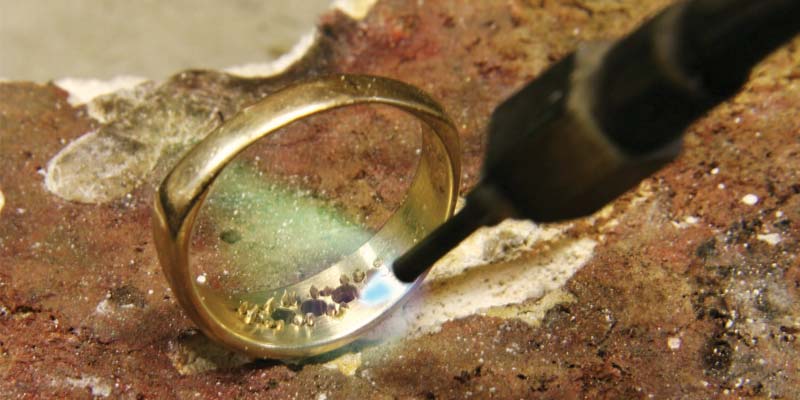 [18]
[18]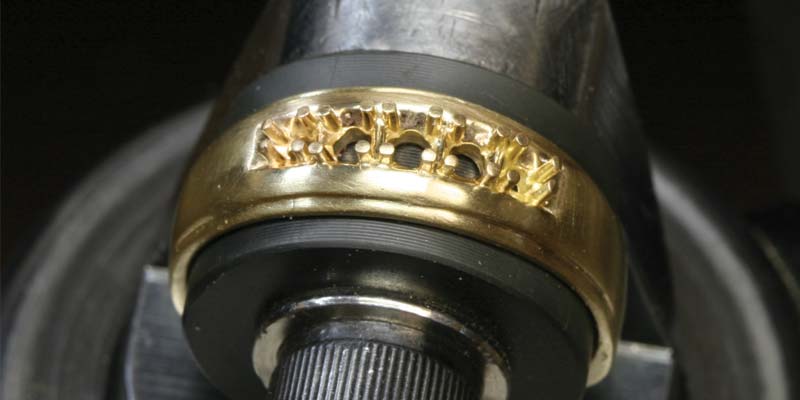 [19]
[19]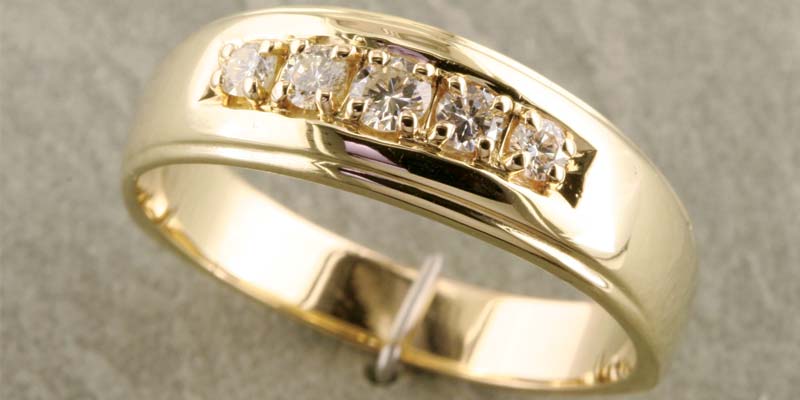 [20]
[20]


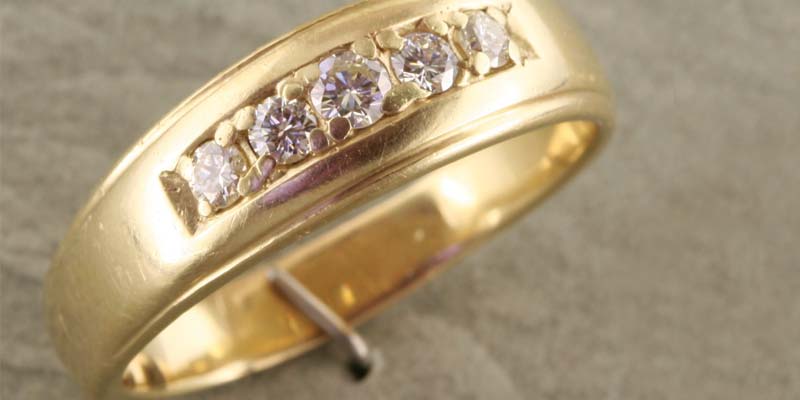
My third example is the men’s diamond band above. This ring is being passed down from a father to his son, who will make it his wedding band when he marries this summer. As can be seen in the picture, the ring needs a complete makeover, including a half shank and new prongs. In addition, the diamonds are buried down in the gold and the prongs have been previously re-tipped. Note they run together and the solder is pitted. This usually indicates easy-flow solder was used and excess material flowed all around. In this case, I recommended reconstructing all the prongs. In repairs like this one, it is not a good idea to re-tip over the old tips, especially when the previous work was done this poorly.
My first task was to remove the diamonds and clean out all the old solder, which was not difficult. I spent approximately half an hour cleaning up the ports with my flat graver. This part of the job does not have to be perfect, as the diamonds will cover most of the space.
After cleaning and lightly polishing, I laid the stones back into their cubbies and marked the positions of each new prong. I chose 0.80-mm wire (18-gauge) for the new prongs and drilled a pilot hole for each one twice, the first time with a 0.70-mm drill bit and the second with a 0.79-mm bit. Using a bit that is the same size or slightly smaller ensures the new prong wire will fit tightly in the hole.
A tight fit ensures the use of less solder, decreasing the chance of creating pitted solder seams. The new prong wires shown in the photo to the left are friction-fit, but they are so tight, they will not move. These small details matter greatly.
It might be tempting to simply create a small dimple and solder the new prong in from the front side, but this is bad thinking. Drilling the pilot holes all the way through allows me to solder from the inside of the ring. This way, excess solder stays there where it can be easily cleaned away. On the front side, only a thin line of solder will appear around the new prong’s base, which can be polished. Since all the old easy-flow solder has been removed, I can now use 14-karat hard plumb solder on the prongs.
In the case of this old wedding ring, I was able to correct several problems. All five diamonds were elevated, so their pavilions were no longer buried in the gold. The prongs are uniform in size, and all the excess solder is gone. In estimating this job, I charged $30 per prong, along with a setting fee for each stone. Remember not to fall into the trap of thinking your customers won’t pay for quality work. In my shop, I have a repair box full of jobs similar to this and a three-week waiting time.
Platinum reconstruction
 [21]
[21]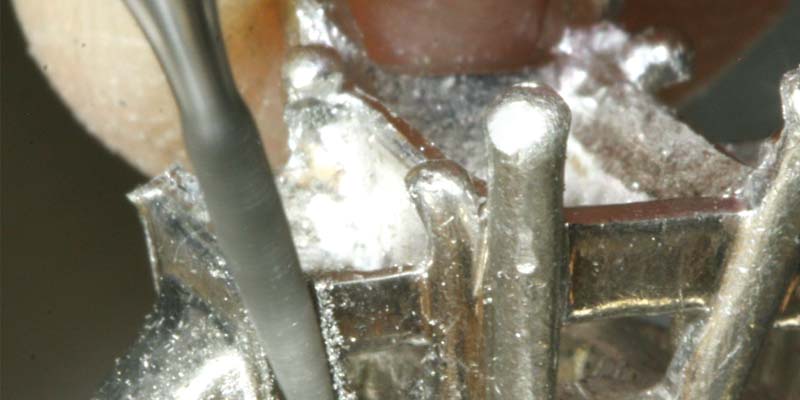 [22]
[22]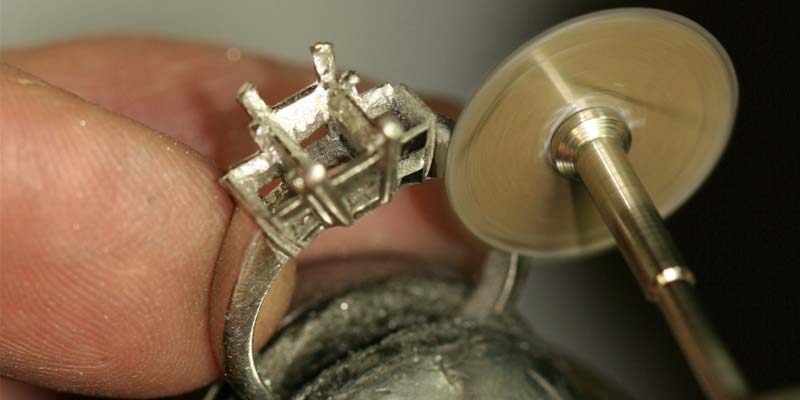 [23]
[23]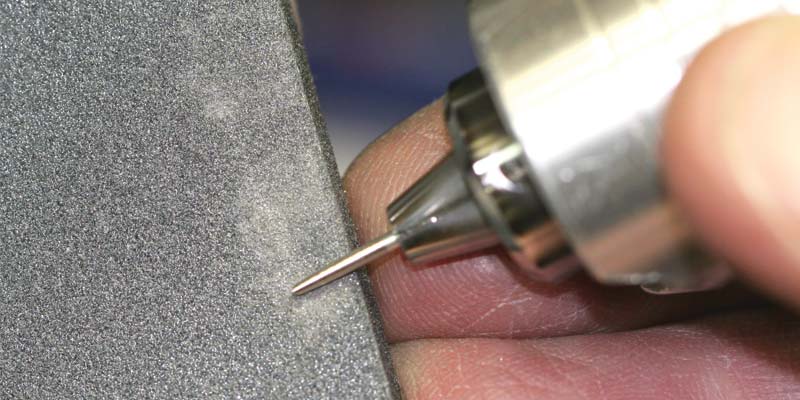 [24]
[24] [25]
[25]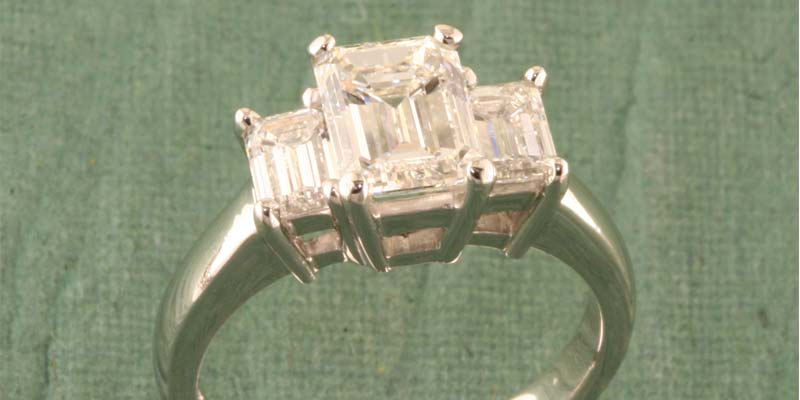 [26]
[26]


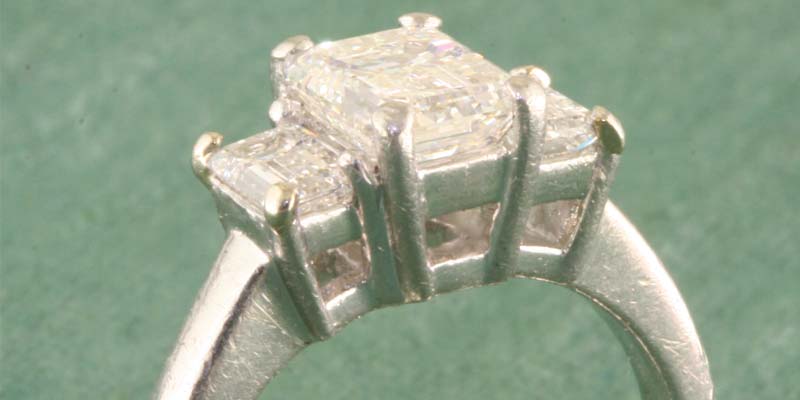
For our last example, we’ll look at the platinum, three-stone ring in the photos above. Featuring about 1.50 carats in diamonds, this used to be a nice ring. The woman who owns it wears it hard, as evidenced by its deep scratches. The outer prongs prematurely wore down in about eight years. The customer took the ring to a jeweller for repair, and as you can see, the prongs were poorly built up using white gold solder. The haphazard work is apparent even to the untrained eye. No longer trusting her previous jeweller, the woman brought the ring to me. I am sorry to say, but examples like this are very common.
If at all possible, we should avoid using gold solder on platinum jewellery. Gold contaminates platinum and can forever alter the method with which future repair work can be done. If you are inexperienced in working with platinum, you owe it to your customers to suggest a more qualified jeweller. In this particular case, the gold solder did not find its way into the bulk of the ring and I was able to remove the contaminated prongs.
After taking out all three diamonds, I used a Kraus bur to grind away the prongs. I stripped each prong all the way down to its base for several reasons. If I had just soldered a short prong tip on top of the old prong stub, I would have had to use a butt or blunt solder joint. This is the weakest type of joint, and it would have failed in short order. Removing the entire prong allowed me to create a long lap joint, which is the strongest type possible. Additionally, the seam for this lap joint would be nearly hidden behind the new prong, reducing the possibility of a visibly pitted seam.
Prior to adding the four new prongs, all the ring’s surfaces were sanded, polished, and cleaned. This is my only opportunity to get into the tight areas and restore them to perfection. As you can see in the photo above, I used a miniature sanding disc, with both 220- and 1000-grit papers. For more on how to make a sanding disc like this one, see Tom’s Tool Tip[27].
Before soldering the four new prongs, I put each into a flex shaft and slightly tapered them on a sanding stick. Tapering prongs is purely esthetic. Personally, I prefer the look of prongs that become thicker as they approach the diamond.
I’ve discussed soldering platinum before, but there are a few key points that bear repeating. First and foremost, always wear a number ‘5’ or darker protective eye lens when soldering platinum. The intense heat (in this case 1600 C [2912 F]) creates significant ultraviolet light, which is strong enough to damage your eyes and can lead to cataracts.
To complete the soldering job, I added tiny chips of 1600 platinum solder, which were flowed into place in the channel carved out by the Kraus bur. Next, I cleaned the ring, laid out the prongs, and reflowed the solder to complete the connection. I sometimes use a laser welder to simply tack prongs in place prior to soldering. Prongs should not be laser-welded in place as a shortcut to soldering. The depth of the weld from lasering alone will not be strong enough to permanently secure the prong in place.
The finished job turned out well, and my customer was very happy to have her ring made safe and beautiful again. In estimating a job like this, I allotted two hours for labour. The materials fee when working in platinum is very high. This job required slightly more than one pennyweight of platinum for which I charged a normal triple markup. All told, this job worked out to $130 per prong.
As this article has illustrated, there are many repair methods a bench jeweller can use when approaching a re-tipping job. A great jeweller learns to assess each job individually, and applies the proper method of repair to fit the need.
I hope you enjoyed this article on re-tipping versus reconstructing prongs. In the next issue, we’ll look at repairing bracelet links. Thank you to those who have written me and offered your feedback.
For more see, If you can’t afford to replace it, don’t laser it.[28]
 Tom Weishaar is a certified master bench jeweller (CMBJ) and frequent speaker on jewellery repair topics for Jewelers of America (JA). He can be contacted via e-mail at tweishaar@cox.net[29].
- [Image]: http://www.jewellerybusiness.com/wp-content/uploads/2016/03/Retip-01.jpg
- [Image]: http://www.jewellerybusiness.com/wp-content/uploads/2016/03/Retip-02-A.jpg
- [Image]: http://www.jewellerybusiness.com/wp-content/uploads/2016/03/Retip-02-B.jpg
- [Image]: http://www.jewellerybusiness.com/wp-content/uploads/2016/03/Retip-03.jpg
- [Image]: http://www.jewellerybusiness.com/wp-content/uploads/2016/03/Retip-04.jpg
- [Image]: http://www.jewellerybusiness.com/wp-content/uploads/2016/03/Retip-05.jpg
- [Image]: http://www.jewellerybusiness.com/wp-content/uploads/2016/03/Retip-06.jpg
- [Image]: http://www.jewellerybusiness.com/wp-content/uploads/2016/03/Retip-07.jpg
- [Image]: http://www.jewellerybusiness.com/wp-content/uploads/2016/03/Retip-08.jpg
- [Image]: http://www.jewellerybusiness.com/wp-content/uploads/2016/03/Retip-09.jpg
- [Image]: http://www.jewellerybusiness.com/wp-content/uploads/2016/03/Retip-10.jpg
- [Image]: http://www.jewellerybusiness.com/wp-content/uploads/2016/03/Retip-11.jpg
- [Image]: http://www.jewellerybusiness.com/wp-content/uploads/2016/03/Retip-12.jpg
- [Image]: http://www.jewellerybusiness.com/wp-content/uploads/2016/03/Retip-13.jpg
- [Image]: http://www.jewellerybusiness.com/wp-content/uploads/2016/03/Retip-14.jpg
- [Image]: http://www.jewellerybusiness.com/wp-content/uploads/2016/03/Retip-15.jpg
- [Image]: http://www.jewellerybusiness.com/wp-content/uploads/2016/03/Retip-16.jpg
- [Image]: http://www.jewellerybusiness.com/wp-content/uploads/2016/03/Retip-17.jpg
- [Image]: http://www.jewellerybusiness.com/wp-content/uploads/2016/03/Retip-18.jpg
- [Image]: http://www.jewellerybusiness.com/wp-content/uploads/2016/03/Retip-19.jpg
- [Image]: http://www.jewellerybusiness.com/wp-content/uploads/2016/03/Retip-20.jpg
- [Image]: http://www.jewellerybusiness.com/wp-content/uploads/2016/03/Retip-21.jpg
- [Image]: http://www.jewellerybusiness.com/wp-content/uploads/2016/03/Retip-22.jpg
- [Image]: http://www.jewellerybusiness.com/wp-content/uploads/2016/03/Retip-23.jpg
- [Image]: http://www.jewellerybusiness.com/wp-content/uploads/2016/03/Retip-24.jpg
- [Image]: http://www.jewellerybusiness.com/wp-content/uploads/2016/03/Retip-25.jpg
- Tom’s Tool Tip: http://www.jewellerybusiness.com/features/toms-tool-tip-3/
- If you can’t afford to replace it, don’t laser it.: http://www.jewellerybusiness.com/features/if-you-cant-afford-to-replace-it-dont-laser-it/
- tweishaar@cox.net: mailto:tweishaar@cox.net
Source URL: https://www.jewellerybusiness.com/features/back-to-basics-tips-on-re-tips/