Breaking through: Tips, tricks, and hacks for bench jewellers
by Katie Daniel | June 19, 2017 10:22 am
 [1]
[1]By Kate Hubley
Insanity: doing the same thing over and over again and expecting different results. ~Albert Einstein
How many of us do this? We come up against a problem and tackle it from the same point of view as we approach everything at the bench: the way we learned. In a world where the bench jeweller is being nudged to the side by technology and mass production, we have to find hacks to help us work more efficiently and save money. In fact, if you look around, some of the best bench jewellers are the ones who continuously add to their bag of tricks, innovating and ‘MacGyvering’ their way towards breakthroughs in their studio.
The three pillars of bench work
I have always said bench work is equal parts artistry, engineering, and chemistry. Sometimes, the engineer diligently attempts to resolve a problem, while the artist and chemist watch on in amusement because they have a far more clever solution.
Artistry
Artistry is how you approach your bench work. Historically, students are taught methods and procedures because of technical success rates. However, these procedures are not always best, especially when they get in the way of problem solving, as master goldsmith, Charles Lewton-Brain, explains.
“When a bench jeweller hits a technical problem, you may not be able to solve it using your traditional knowledge. Instead you need to look at it differently,” he says. “You need to understand the process and ask yourself what is happening?”
The process approach involves the following steps:
- Take a step back.
- Describe the problem.
- Brainstorm ways of solving the problem.
- Choose the best solution.
Lewton-Brain is also a great proponent of recycling, reusing, and repurposing. When you need a specialized tool, but would love to find a cheaper solution, go to someone who uses so much of it they don’t value it the same way you might.
 [2]
[2]Obstacles: They’re all in your mind
The mind is a battlefield. Do you sit down at your bench feeling intense or lighthearted? Is it a chore or joy? I find sometimes we are not even aware of our headspace.
A few years ago, I took a week-long clinic at the École de Joaillerie de Montréal with Antonio Serafino of Serafino World Contemporary Jewellers. I brought a personal project to work on that was a little out of my depth but doable. Unbeknownst to me, I kept heaving sighs and fidgeting in my seat, elbows up and flailing in the air. Serafino asked me to stand up, and he sat down in my seat. His posture was relaxed and he explained how I should “hug my bench,” while placing his arms gently around the scoop. In a matter of seconds he changed the way I approach my work forever.
Kate Wolf, master wax carver and innovator of a line of new-generation waxes and wax carving tools, says she observes fidgety, sigh-heaving students in all her classes “It is perfectly normal to feel like it’s amateur hour at the bench from time to time, no matter how seasoned you are.”
She also says you should give yourself permission to make mistakes, to play, and to breathe. Further, Wolf explains how it’s important to get in over your head and be out of your comfort zone; stretch yourself by creating a problem so you can find a solution. These exercises are essential for the creative process. They are also how breakthroughs happen.
Engineering
Engineering at the bench is using practical knowledge to problem solve and innovate. The artistry I described above, along with engineering ingenuity, is what led Wolf to develop her soldering clay. I have found this to be one of my favourite products and frequently use it to buttress-up large pieces with long seams. It keeps everything in place should your previous solder begin to flow.
One of the more common tricks for complex soldering is to set everything in plaster of Paris. However, you’re racing against the clock, trying to set it all up in the few precious seconds between workable viscosity and hardness. It’s time-consuming and can be a bit messy, but worth it if done well.
 [3]
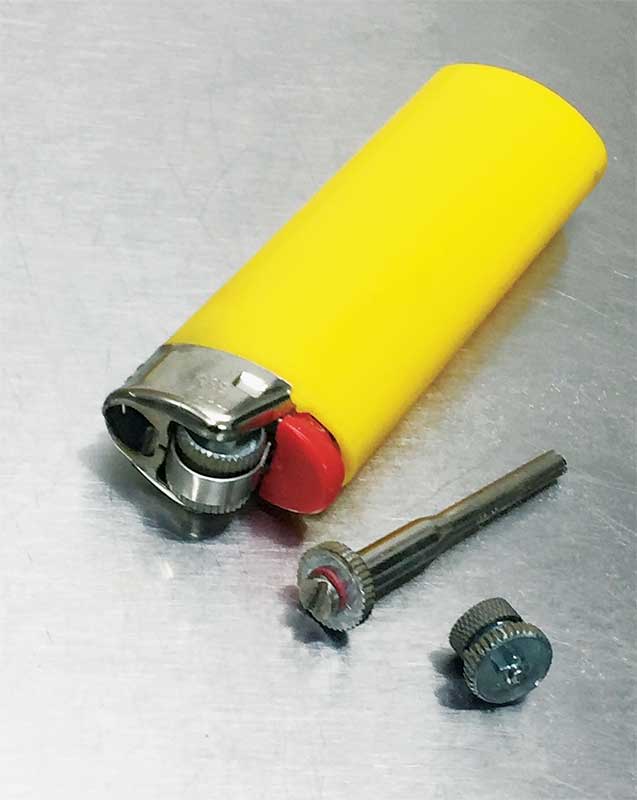
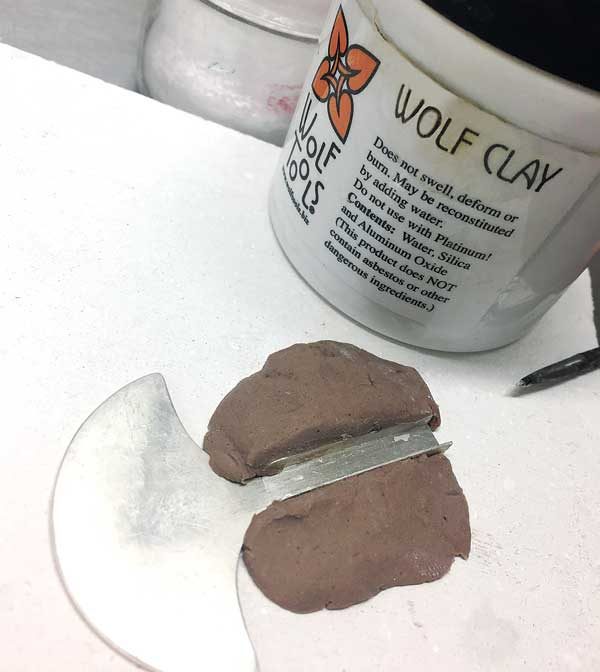
[3]Glue before soldering? That’s a little crazy
An interesting trick I learned from Wolf was to use a small dab of super glue on the end of a broken saw blade to set up pieces for soldering. Then, pack clay around the piece to get it ready for soldering. As the piece heats up, the glue evaporates and the solder gets pulled into the seam. Remove the clay and rinse thoroughly in water before dropping in the pickle. You can save the clay and reconstitute it with a little moisture. I have also used it to prop things up and get my soldering done in one shot.
Mini lap grinder
If you have a GRS Benchmate, you can use Wolf’s simple adaptor to hold your flexible shaft. I have found a thousand uses for this. In addition to turning my flexible shaft into a mini lathe for wax as originally intended, I created a small lap grinding wheel by slicing a sanding disk. It’s perfect for tiny pieces like a logo tag.
Solderite
Have you discovered Solderite? I love these asbestos-free soldering pads. They are lightweight, cool down quickly and don’t crumble, so you can drill into them to set up your work. They are great for basket prongs. You can drill 2 mm (0.08 in.) deep and use a guide to create consistent angles on all posts.
Chemistry
Chemistry at the bench is leveraging the chemical properties of the materials you’re working with to achieve more efficient outcomes.
A little bit of metallurgy on your side
Christine Dwane, 2016 NICHE Arts Educator of the Year, and teacher at the École de Joaillerie de Montréal and École de Gemmologie de Montréal, shared her favourite tip with me: age-harden your metal, especially silver, since it is generally quite soft.
The final time you heat your metal, whether from soldering or annealing, cool it as quickly as possible. Before you proceed to polishing, place the metal in a kiln at a temperature of 300 C (572 F) for an hour. This will age-harden your metal, and allow you to achieve a better polish and make your metal more durable.
 [4]
[4]Going against the flow
Some projects call for a different soldering approach. I once assembled a ring by soldering. If my count is right, there are 33 joints on a size 4.5. I used a trick I learned from Lewton-Brain for this one: solvent-based liquid paper will keep the solder from flowing. In my experience, the brand you choose does not make a difference.
Apply a small amount to the soldered joints. Let it dry before applying heat to reduce fumes. Then solder using flux on your new joint or joints as you normally would. Rinse thoroughly with water before pickling.
Although some research has been done on the toxicity of super glue and liquid paper, err on the side of caution and make sure your work area is well ventilated.
Community and the artistry of sharing
You don’t have to give away all of your trade secrets, but it is wonderful to share processes and tips with fellow jewellers to keep bench work alive. It’s okay to have one technique that’s become your trademark, which you want to keep for yourself. That’s your prerogative.
The notion of knowledge sharing, however, raises the level of the industry as a whole and gives you more places to seek out information when you are faced with a challenge.
There are a number of online communities where you can find a wealth of information, most notably, www.ganoksin.com[5]. Founded in 1995, it is the world’s largest technical online resource for jewellers and related fields, and includes jewellery-making forums and galleries.
With these tips, tricks, and hacks, I hope you can rethink whichever traditional procedures may be holding you back. Perhaps, you will come up with new, more efficient ways of working at the bench, and hopefully have a few breakthroughs you’ll want to share, too.
Kate Hubley is owner of Montreal design house, K8 Jewelry Concepts Bijoux. She is also a Fellow of the Gemmological Association of Great Britain (FGA) and a 2015 Saul Bell Award recipient. Hubley can be reached at kate@k8jewelry.com[6].
- [Image]: https://www.jewellerybusiness.com/wp-content/uploads/2017/06/Kate-Hubley_Bench.jpg
- [Image]: https://www.jewellerybusiness.com/wp-content/uploads/2017/06/Kate-Hubley_PHOTO-1.jpg
- [Image]: https://www.jewellerybusiness.com/wp-content/uploads/2017/06/Kate-Hubley_PHOTO-2.jpg
- [Image]: https://www.jewellerybusiness.com/wp-content/uploads/2017/06/Kate-Hubley_PHOTO-8.jpg
- www.ganoksin.com: http://www.ganoksin.com
- kate@k8jewelry.com: mailto:kate@k8jewelry.com
Source URL: https://www.jewellerybusiness.com/features/breaking-through-tips-tricks-and-hacks-for-bench-jewellers/