Creating a lasting memento for a friend
By Virginia Muralt
A few months back, my friend, Corey, asked if I would be interested in taking on a custom jewellery job, as he had been contacted by someone looking to have necklaces made. This struck me as odd, as Corey isn’t a jeweller; he’s a taxidermist. Understanding my confusion, Corey explained his potential client wanted these necklaces made from his dog’s canine teeth.
Necklaces… Out of dog teeth? I had heard stories about jewellers receiving somewhat-unconventional requests, like pendants with human hair, but this was the first time I had been approached for something in this ballpark.
I started doing independent jewellery jobs as part of my own small goldsmithing business after getting laid off amidst the pandemic. I had completed some small repairs for friends and family, but nothing too substantial. To supplement costs, I was working a full-time job in retail and goldsmithing in my off time. So, when Corey brought up this potential custom job, I was intrigued. Little did I know the project would be one of the most meaningful, challenging, and rewarding custom jewellery design and fabrication projects of my career thus far.
A heartfelt story
I can’t lie—going into the initial consultation, I felt nervous. Before the pandemic, I had worked as an in-house jeweller at a small shop. When I took on custom jobs, I always had a business to back me up if something were to go wrong. This time, however, I was on my own. I didn’t know if it was a project I could do, especially considering I was working with a new and unfamiliar material.
When I met with the client, Larry, and he told me his story, I could hear the love and devotion he had for his family. This helped me see a clearer picture at what he wanted to achieve with this project and the meaning behind it.
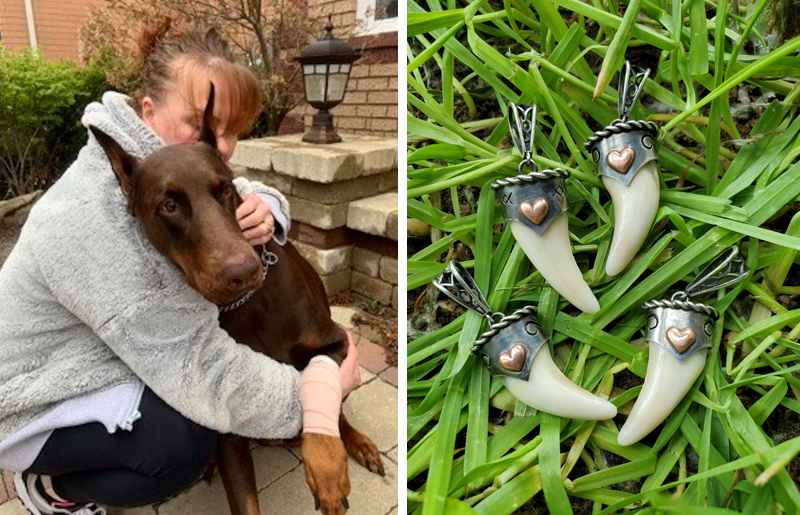
In 2015, Larry’s wife, Karen, was diagnosed with cancer, and had to undergo surgery, as well as many rounds of radiation. Around this time, a family friend’s red Doberman had puppies, and Larry and his family decided to visit the litter to take their mind off things. It was there where they first met Holly, a curious and playful puppy who was immediately drawn to Karen. It didn’t take long to realize the pup was part of their family. Holly quickly became a much-beloved friend and pet to Larry, his wife, and their two young daughters. Throughout Karen’s cancer journey and the subsequent good and bad days, Holly never left her side.
Sadly, in 2021, Holly was diagnosed with an aggressive cancer of her own. Despite a leg amputation and several rounds of chemotherapy, the cancer spread to her spine, and Holly had to be put down. The family was devastated.
Before Holly was cremated, Larry asked the veterinarian to extract and clean the dog’s canine teeth in the hopes of creating a memento for him and his family. He stressed he wanted something his daughters could physically hold when they needed to be reminded of Holly.
Once I heard this story, I felt instantly connected to the family’s heartbreak over losing a loved pet. A few months earlier, I had to say goodbye to my childhood cat, Sapphire (a.k.a. My Sweet BaBoo), due to a terminal illness she had developed suddenly. I was heartbroken—I still am. Larry and I bonded through our respective loss.
Practically, of course, there was a lot to consider. I had never worked with organic materials, and this would be my first custom project as an independent jeweller. Ultimately, though, I felt such a strong connection to Larry’s story and his heartbreak. I desperately wanted to make something to honour his family’s furry friend.
The design
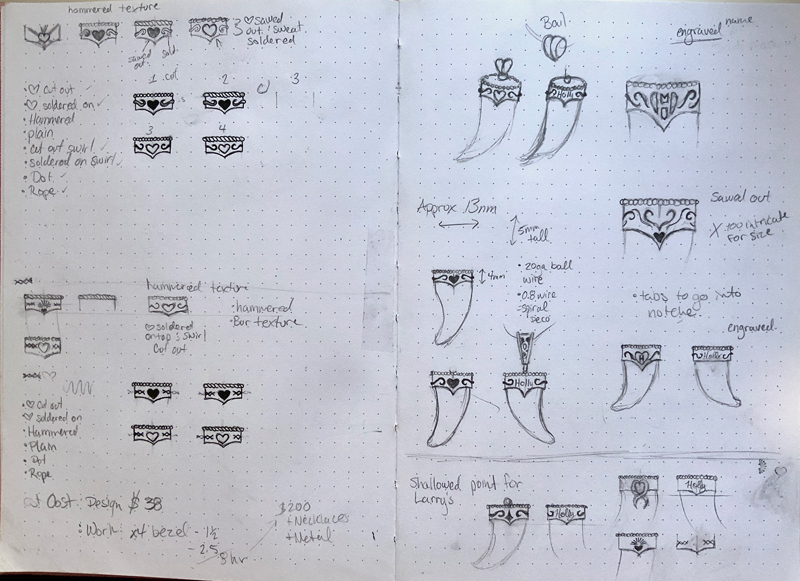
Drawing inspiration from shark tooth-style necklaces, Larry wanted to create four pendants for his wife, their two daughters, and himself. Given there were several ways to go about creating these pendants, I put together a picture board prior to our design meeting to show him several examples of animal teeth and claws which had been turned into jewellery (Figure 1). Having this visual aid helped Larry better understand the designs and choose which style of pendant he liked best. Out of the assortment, his eye was drawn to a design where the top of the tooth would be capped with an upside-down bezel cup and then hung from a bail to draw focus to the point of the tooth.
Once we had selected the style of pendant, I asked Larry about the personalities and personal style of Karen and his daughters to get a sense of how I could create something unique and personal. Larry said they preferred more everyday-wear-type jewellery, but also enjoyed some ornate styles. He mentioned he liked the look of two-toned jewellery and would prefer a design that wouldn’t get in the way or hinder movement.
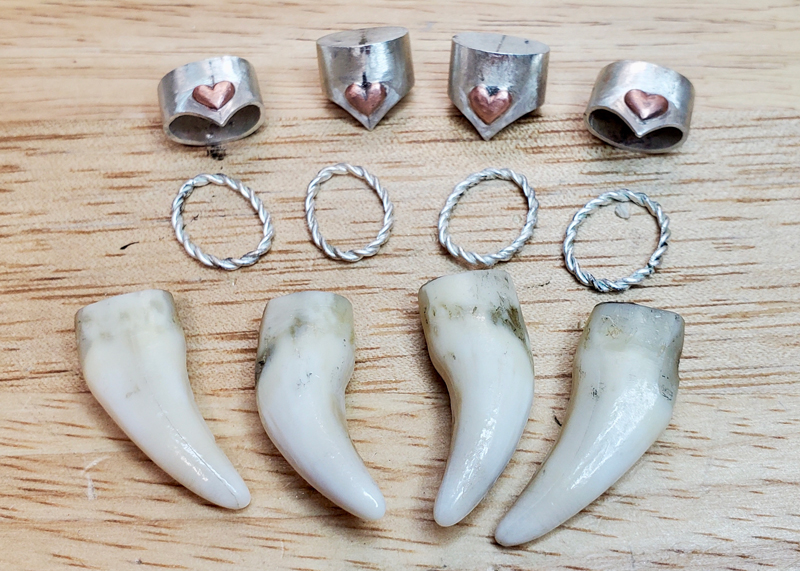
The end-design was an oxidized sterling silver tooth cap with the front bottom edge brought down to a slight point, emphasizing a copper heart in its centre. The heart was requested by Larry as a tie-in of Holly and her personality—she was, of course, a red Doberman and ‘always had a big heart.’ For added personalization, I incorporated engravings of Holly’s name to the back of each pendant, which also helped to balance the overall design.
Swirl cut-outs were added between the copper heart and the engraved name to create more visual interest between the oxidized silver and the white of the tooth seen through the cut-out. For his own pendant, Larry requested something slightly different than the others regarding the side ornamentation. He had mentioned in our initial meeting about liking simple, Norse-style designs, so I added an ‘X’ pattern along the side to give his piece more of a Viking feel.
For a finished look, I suggested including a 3D decoration element around the top edge. This would help the overall tooth cap appear more symmetrical and hide any crooked edges due to the imperfect shape of the teeth. Out of the options I provided, Larry selected a twisted rope-style design, and I found prefabricated bails to match the overall style.
Research

Once the designs were finalized, I set upon researching how to properly preserve and stabilize teeth for jewellery (Figure 2). This ended up being a larger challenge than I anticipated. After consulting with jewellery and taxidermy groups online, scouring the internet for suggestions, and making inquiries to the Canadian Conservation Institute (CCI), I settled on a few options.
The most promising solution for permanent preservation, I found, was to use a resin suspended in acetone (typically used in museums to protect fossils); however, due to supply chain issues, it was impossible to find the product in Canada. Using spare teeth provided by Corey, I tested several other products, but found they did not achieve the desired effect and left an unnatural, sticky texture. As such, these options were eliminated.
It was only when I was finishing up the fabrication that I discovered low-viscosity Cyanoacrylate Adhesive (CA) glue, which is known for being ‘water thin’ and designed for stabilizing a wide variety of natural materials. The low viscosity of the glue easily seeps into pores and cracks of a material, creating a solid bond and a layer of protection.
Preparing the teeth
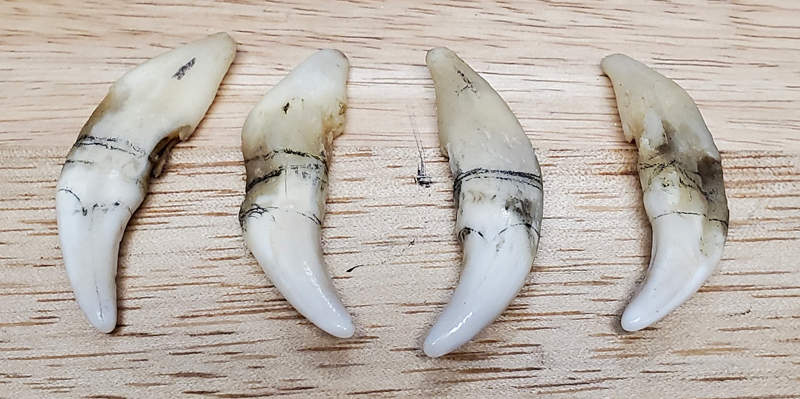
To prepare Holly’s teeth for the pendants, I first brushed them with a diluted solution of hydrogen peroxide to whiten them. Given it would be a few weeks before I would touch the teeth again, I placed them into mineral oil to keep them from drying out, as I have a large dehumidifier run constantly in my jewellery studio and it could dry the teeth too quickly. These precautions kept the teeth safe and helped soften them enough to make cutting the dentin (i.e. the top part of tooth that sits in the gums) less of a risk for cracks.
Unfortunately, I learned the hard way that, when going with this method, you must dry the teeth out slowly from the mineral oil or the sudden change will cause cracks. Sadly, two out of the four teeth developed hairline surface fractures—not deep enough to risk the integrity of the teeth, but noticeable if you ran your finger along the surface. In my quest and fear to not crack these irreplaceable teeth, I managed to crack two of them.
When the time came for cutting the teeth down to their final size, I had to take several precautions, as breathing in organic materials can be highly toxic. A respirator and safety glasses were worn. I also attached my shop vacuum hose to sit beside my cutting area to suck up any flying dust or particulates. To get a good, straight cut through the dentin, I used a spiral wax saw blade instead of the usual straight saw blade.
Next, I drilled out the root canal of the tooth to prevent further decay from within and filled the void with epoxy, creating a strong core. From there, I used sandpaper to establish the final length and create a rough surface, which would allow the epoxy a better hold when it came time to glue it into the pendant caps.
Fabrication
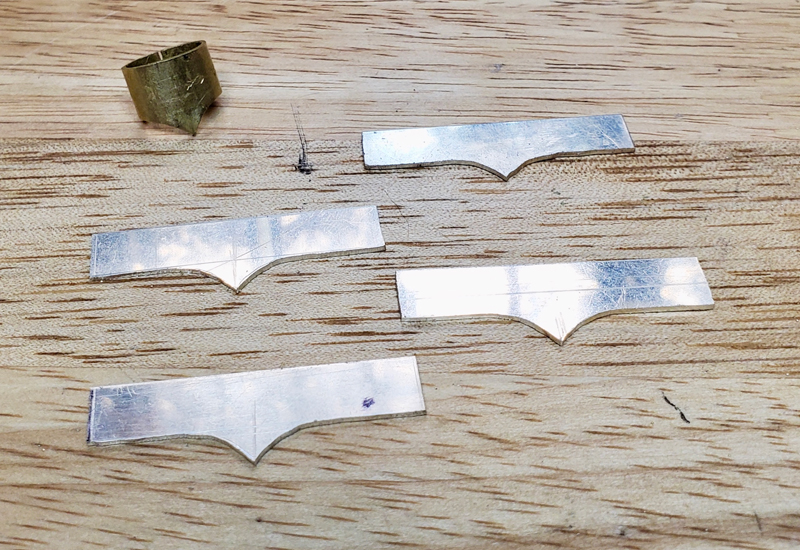
When planning the pendants’ orientation, the overall shape of each tooth had to be considered. The imperfect oval shape of the teeth meant each one had a smooth side, which became its front, as well as an uneven side, which was hidden as the pendants’ back.
Each cap had to be made to fit its specific tooth perfectly (Figure 3). This took the most amount of time out of the fabrication process. Each curve made to the sterling silver had to be checked against the respected tooth to ensure everything sat flush.
After sawing the heart centre pieces from a sheet of copper, I filed them to rounded, 3D shapes. This gave these elements more visual interest and depth.
Once the copper hearts were soldered on, I began the engravings of Holly’s name. The tooth cap had to be supported to avoid being crushed in my manual engraving machine. To fill the empty void inside the cap, I used moldable thermal plastic, which softens to pliable form when placed in hot water and hardens when cooled (Figure 4).
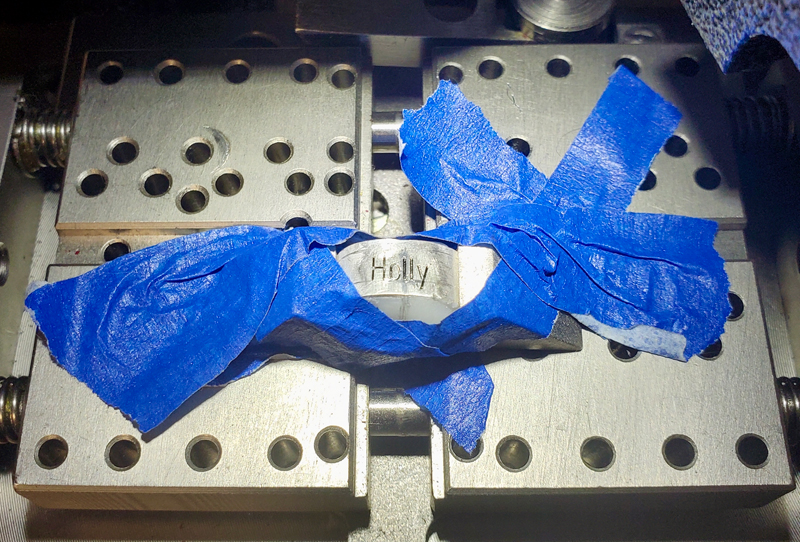
Given the tooth caps were not perfectly flat, finding a position where the pieces would be supported without slipping was a challenge. However, I caught a break with the oval shape of the teeth, and I was able to fit the caps directly into ‘C’-shaped pins to hold them steady. I ended up taping everything down to ensure there was no movement while I engraved (Figure 5).
After the four pendants were engraved, the next part of the fabrication was the side ornamentations. For the swirl cut-outs, I used a series of ball burs, starting with the smallest, to mark out the initial swirl shape, then continued up in size until the desired size and shape cut-out was reached (Figure 6). Careful to use the small ball burs for tighter curves, I created variations in the thickness of the swirls for more visually interesting ornamentation.
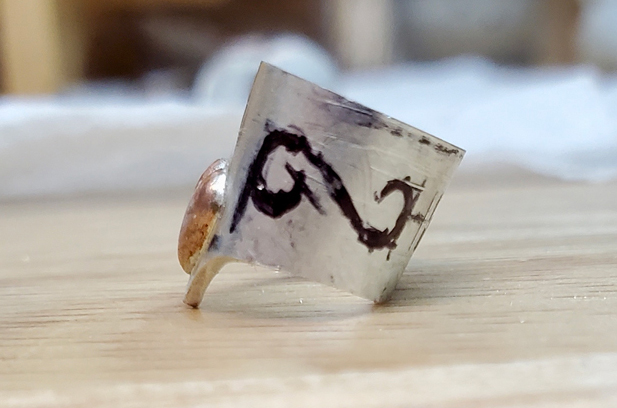
To complete the ‘X’ design on Larry’s pendant, I used a thin saw blade to cut the pattern into the sterling silver. While I had to go back a few times to clean up lines where I had slipped, this was quick work with the rotary burnisher.
Sadly, however, this is where I messed up. Upon starting the fabrication of the pendants, I decided that, rather than doing a straight walled upside-down tooth cap as planned, I would, instead, taper the walls. My thinking was if the glue ever lost hold, the tooth would be held in by its natural tapered shape and this would stop it from falling out.
I made half a dozen models to get the taper just right and I was approaching the last half of the fabrication process when I realized my mistake: in tapering the originally designed straight-tooth cap, the only way to get the teeth into the bezel was to drop them in from the larger end of the taper. This was a problem—I still needed to solder the top to the cap where the bail was supposed to be attached, but, unfortunately, I couldn’t do this with the teeth inside, as the heat would burn them to a crisp.
After much debate (and contemplating my future in the jewellery industry), I decided my best option to preserve and protect as much of the teeth as possible was to start the project fabrication over. As it turns out, forming non-tapered caps went much faster than before. From there, I soldered back on the copper hearts I had saved from the tapered batch, engraved the names, and recreated the side ornamentations.
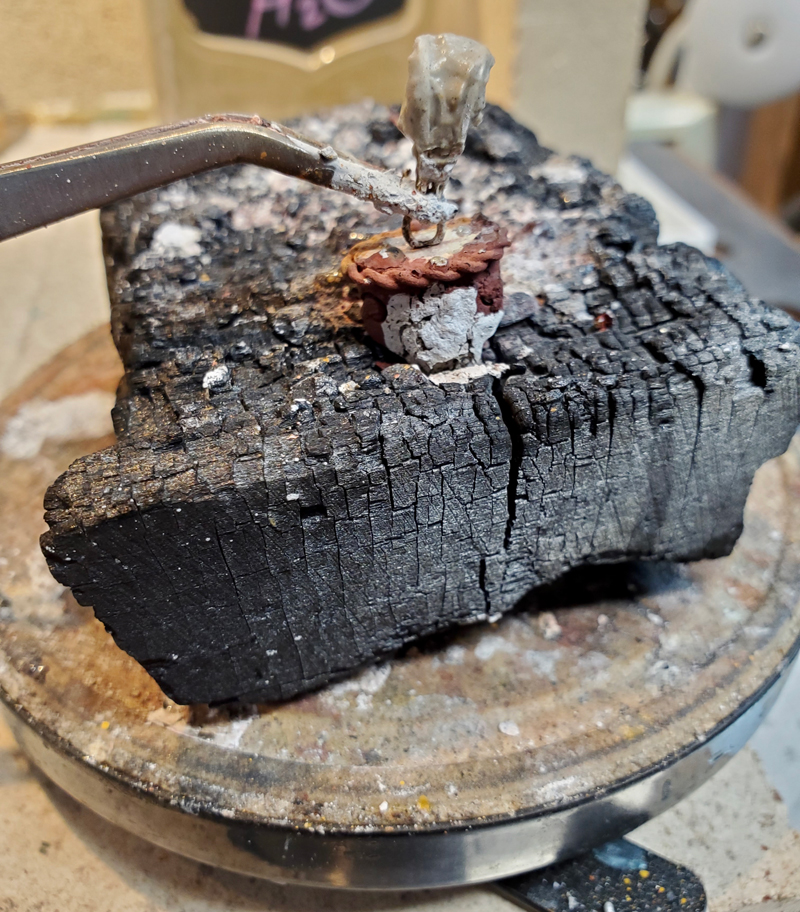
The last step in the fabrication process was soldering on the rope decoration (made from twisting two pieces of 1-mm sterling silver wire together) to the top edge of each pendant, and, finally, attaching the bail (Figure 7). The latter presented a challenge due to the previous soldering I had done to the overall tooth cap. If I heated the metal too much, I could end up having pieces sliding out of place or coming off all together. To avoid this, I created a heat sink for the parts I did not want to overheat (Figure 8), then coated everything in a thick layer of yellow ochre to prevent solder from flowing. From there, the bails were soldered on without incident.
Finishing touches
Once the tooth caps were cleaned from soldering, I did a few rounds of silver blackener to turn the white sterling silver into a nice matte black. From there, the caps went into the rotary tumbler to work harden and give them a final finish. After a few hours in the tumbler, they came out a polished black colour with deeper hues in the recesses (Figure 9). I polished the high parts of the ornamentations (including the copper heart, bail, and rope decoration) to create contrast and make the details pop.
The final preservation and stabilization of Holly’s teeth came next. In my testing, I had discovered the best way to apply the CA glue was to paint it on (Figure 10). I completed several thin layers, making sure to allow time for the glue to seep into the teeth and dry between each layer’s application. This helped maintain the natural texture of the teeth. Finally, I roughed the inside of the finished tooth caps with sandpaper and epoxied the teeth into their designated caps.
As an added connection to Holly (and her distinct coat), the pendants were presented on a red leather cord (Figure 11). I also provided sterling silver chains as an alternate option to wear the pendants, along with a small polishing cloth. To complete it all, the pendants were gifted in a lovely brownish-red wooden box.
After months of late nights and hard work, Holly was ready to go home. Larry had kept the commission a secret to allow for a surprise ‘reunion’ with Holly for his family.
What I learned
When dealing with irreplaceable materials (i.e. stones, teeth, etc.), there is always a chance something can go wrong. Having your client sign a contract outlining these risks, as well as the expected time frame to complete the project, can help cover your butt. Thankfully, I had Corey at my disposal—he deals with irreplaceable materials in his taxidermy business and was kind enough to help me create a contract. I also lucked out in that my first custom client was very flexible and understanding, especially for delays. Of course, I realize not every client is going to be like Larry.
I also learned not to be afraid to seek out advice from colleagues and other professionals. I miss having a creative group of people to review my work and point out my mistakes like when I did during my schooling. If I had not decided to change my design last minute, I most certainly would have not wound up wasting so much time on a tapered tooth caps. It is worth remembering the time spent fixing the problems you create for yourself is money out of your pocket.
Why I said ‘yes’
Although I had no experience working with organic material and it would have been easier to turn down this commission, this was a project I truly wanted to do. I was keen for the experience of doing a custom project as an independent jeweller, learning to work with a new material, and stepping out of my comfort zone—but, more importantly, it was something I wanted to do for Larry’s family. I felt their pain of losing a beloved pet, and I was honoured to make something special to give them fond memories of Holly.
A month or so after completing the project, I received a heartfelt message from Karen, thanking me for the jewellery. It made all the trouble, late nights, and frustration worth it when I heard about how special and meaningful the pendants really were. It also reminded me I have a skill which allows me to create small pieces of art families can cherish for generations to come.

 glue was painted on in several thin layers.")


 glue was painted on in several thin layers.")

 Virginia Muralt found her passion for jewellery creation and design in 2015 while completing her jewellery certificate at Fleming College in Haliburton, Ont. To further her knowledge and skills in the field, she attended the jewellery arts program at George Brown College, graduating in 2019. Most recently, Muralt won second place for Canada in the 2021 DeBeers Shining Light Awards, an international competition for young emerging jewellery designers.
Sign up for our newsletter
Get all the latest news and features from Jewellery Business. Submit your email below to get our twice-monthly newsletter.
Products
Read the Latest Issue
