‘Future perfect’: Love takes an interstellar journey
by charlene_voisin | May 1, 2014 9:00 am
By Llyn L. Strelau
 [1]
[1]
My business model has always centred around custom design—reading the client, getting deep in their psyche, and giving them what they want (even if they don’t know what they want). A client’s inspiration can range from a collection of magazine clippings and Internet captures to napkin sketches, grandma’s antique engagement ring, or a beach pebble from a memorable vacation. Often the genesis can be a particular gemstone, be it a birthstone or simply a favourite colour. Hobbies, lifestyle, remembrance of a loved one, or the celebration of a new life together can all come into play. Occasionally, there is little offered as a starting point, which means I have to work much harder to get the creative ball rolling.
Sometimes, however, there is a more focused request—the client has very definite ideas of what they wish to have made and then it is my job to take the concept and make it a reality. The subject of this article is one of these projects.
Firing up the engines
 [2]
[2]A young professional man came in for a consultation. He wished us to make an engagement gift for his boyfriend, a research physician, that would mark this next stage of their relationship.
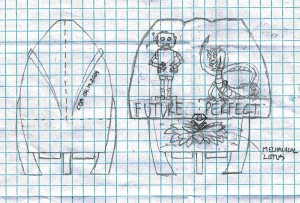
He brought in a very clear sketch and one that I found extremely intriguing. The creative juices started flowing and over the next couple of meetings, the project began taking shape.
My client (I will call him Charlie, his partner David) wanted a small sculpture/objet d’art in the form of a retro-style spaceship, which when opened, revealed several elements with significance for the couple and their relationship.
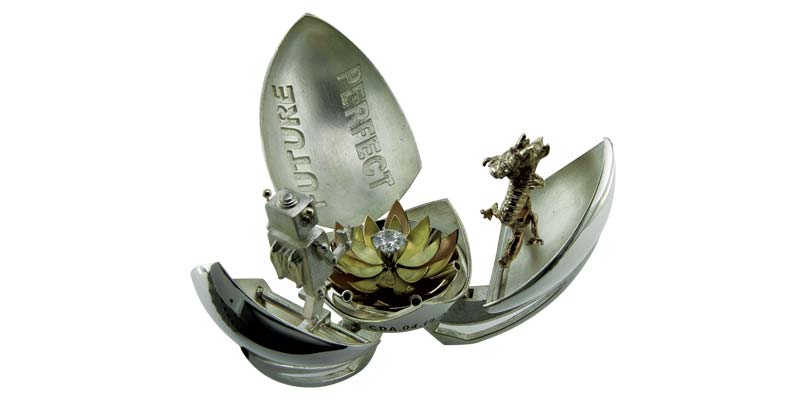
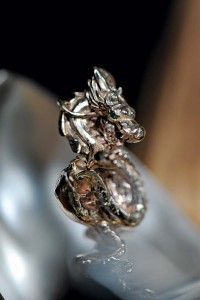
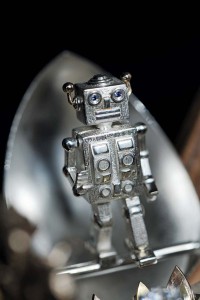
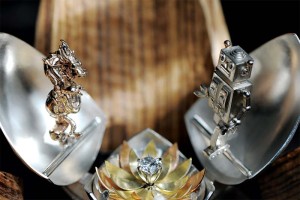
In addition to their motto, ‘FUTURE PERFECT,’ there were to be two passengers aboard: a stylized robot to represent Charlie and an Asian dragon with five claws on each foot for David, who is from the Far East. Inside, the spaceship was to contain an open lotus flower, with a diamond centre that sits above the mechanical structures representing the craft’s engine. The ship’s registration number, CDA 04.19.2009 (the date marking the beginning of the ongoing Charlie and David Adventures) was to be engraved on the outside.
Although the client’s original sketch showed an egg-shape spacecraft that opened like a three-panel screen, I immediately imagined it as a three-petal flower. When open, it would reveal the lotus in the base, with the robot in one alcove, the dragon in another, and the ‘FUTURE PERFECT’ legend in the third. Now the question was, how do I make the concept a reality? It was very difficult to establish a firm budget at this stage—we had not crafted anything quite like this before. Fortunately, the client had some flexibility in this regard. There was give and take, as well as compromise, during the construction and we were able to work together as the project proceeded.
Blasting off
 [3]
[3]The spaceship’s body was to be approximately the size of an extra-large chicken egg or a Kinder Surprise chocolate egg! (We contemplated using lost ‘chocolate’ casting, but decided it would be better to just eat the chocolate.) On a serious note, we also rejected casting a plastic toy egg or carving a wax model by hand. Raising the egg from a sheet of silver was another option, but achieving the necessary accuracy would have been difficult and budget was a consideration.
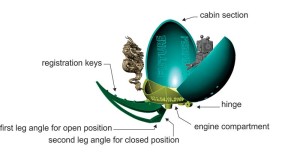
Therefore, we decided to use CAD. First, I modelled the basic shape using Rail Revolve, trimming the bottom of the egg to leave a flat bottom. Next, I drew three arcs on the lower surface and used them to first define and then split the ship’s lower engine compartment from the upper cabin section. At this point, since the egg was just a simple shell with no thickness, I had to bulk it up. For simplicity, I used CAD to split the upper cabin portion into three equal pieces, deleted two of them, and then used the single remaining piece for the next steps. I offset the original surface and drew the construction curves needed to create new connecting surfaces.
 [4]
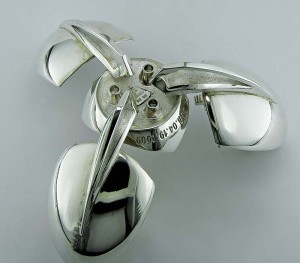
[4]After joining these surfaces, I had a cabin section with 2-mm thick walls, heavy enough to be cast, but not too massive. In the top-down viewport, I used ‘rotate/copy’ to duplicate this piece to create the two remaining cabin sections. One of the cabin segments had the words ‘FUTURE PERFECT’ incised on the inside. Using the same offset surface method, I thickened the lower engine compartment section. Next, I added three exhaust ports to the bottom of this section and we inset CDA 04.19.2009 into the outside of the engine compartment.
The next step was to model one leg strut. Using the client’s original sketch as the impetus, I modelled a graceful leg with an open section and sleek curved surfaces to maintain an aerodynamic appearance. I added registration keys to the leg and cabin wall to permit accurate alignment in the final assembly steps. I replicated the finished leg twice and oriented one to the centre of each of the three cabin sections. I modelled hinge knuckles to attach to the lower ship section and used ‘Boolean subtraction’ to create corresponding sockets in the legs, with holes cut out for the hinge pin. Each leg and its attached cabin section were designed to pivot open from the lower engine compartment. The two angles on the bottom of the legs were chosen specifically so the ship would sit solidly on three legs in both the closed and fully open positions. Doing this in CAD enabled me to ensure the orientation and alignment would be as accurate as possible.
All systems are go
 [5]
[5]Now it was time to create the two passengers in the spaceship. I modelled the robot in CAD and scaled it to fit comfortably in its alcove. Its arms are articulated and would be milled in several pieces before assembly. The Asian dragon began as a 3D model purchased from the Internet. Since it required modifications with software I do not have, I enlisted the help of Harry Hamill, a colleague in the United States. Harry made the changes needed, such as adding five claws to each foot and giving a more sinuous twist of the tail and graceful turn of the head.
With the CAD modelling finished, I e-mailed the files to another colleague, Matthew Todhunter in Edmonton, who did a superb job of milling these complicated models. Jerome McCann, one of our goldsmiths at the time, took over the main construction. We cast the four pieces of the ship’s body, leg struts, and robot in a tarnish-resistant silver alloy, and the dragon in yellow gold. Casting larger items in silver can be problematic—one of the cabin sections failed to come out right the first time and had to be milled again and re-cast. (This is another advantage of CAD technology—it would have been very time-consuming to hand-carve a replacement.) The usual bench techniques were used to finish all the components. We had some problems during assembly due to distortion in the casting and finishing steps, as well as warping of the cabin segments, but with some tweaking, we completed the basic body of the spaceship.
 [6]
[6]We used blue sapphire for the robot’s eyes and emerald for the dragon. The two passengers were attached to lengths of silver tubing that pivot on rods spanning the walls of the cabin segment. They can recline during ‘flight’ mode and return to a vertical position when the ship is in its open state.
The next step was to hand-fabricate the lotus blossom. We stretched the budget and decided to use three colours of gold to make three layers of petals. Circles of decreasing size were cut from thin sheets of red, yellow, and green gold and dapped to make hemispheres. These were each split into six segments and assembled in concentric layers around a central female bayonet finding using a laser welder. Initially, the flower’s centre was to be a one-carat diamond, but budgetary restraints nixed this and a cubic zirconia became the temporary replacement. The six-claw, white gold setting holding the stone has a corresponding male bayonet finding, so it can be removed and replaced with a diamond or other gem at a future date.
Final finishing and polishing came next. Since the spaceship is meant as a display piece, we decided to commission a wooden case for it. John Lavoie, a fine Calgary craftsman, created a tiger-wood egg-shape box that also opens like a three-petal flower. We fitted brass pins into the base to lock into the three exhaust jets on the base of the engine compartment. The client found a glass dome that accommodates the entire assembly, offering the couple a good dust-free environment in which to display the gift.
The voyage continues
 [7]
[7]The spaceship was presented and the engagement sealed. Within a year, our clients returned to discuss wedding bands. Naturally, after the complexity of the engagement gift, I did not expect the rings would be easy. Although they look very simple, indeed, they were not.
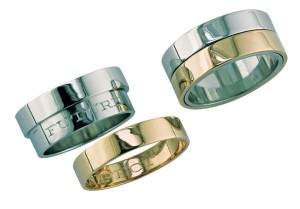
The request was to make two 9-mm pipe-style platinum bands with 2 mm of height. Half the width of each ring was to be stepped down and an additional 4.5-mm wide rose gold pipe-style band would slip over the recessed portion to complete the wedding band.
Where it became complicated was engraving one ring with the word, ‘FUTURE’ on both the exterior of the stepped-down section and on the inside of the overlay band. The other ring would similarly have the word ‘PERFECT’ engraved on it. David and Charlie decided they would wear their rings during the extended engagement period and exchange their outer bands to complete the sentiment ‘FUTURE PERFECT’ during the wedding ceremony. The words would be a secret message, since the engraving is not visible unless the overlay ring is removed.
It would have been much easier if both gentlemen had the same finger size, but one was size 8 and the other size 8.5. CAD came to the rescue again and I was able to use it to help calculate the required measurements to make this work.
 [8]
[8]I ordered machined platinum bands from a manufacturer, since they would already be work-hardened. The company was also able to mill the recessed portion of each band for me. We could have filed down the section in-house, but that would have left us with a lot of platinum filings that are expensive to refine, so it was worthwhile paying the manufacturer to make the base bands.
We hand-fabricated the rose gold bands to fit. Due to the half-size difference between fingers, the depth of the recessed section of each platinum band had to be adjusted to compensate, since the outside diameter of both had to be identical. Correspondingly, the rose gold bands had to have identical inside diameters, though different outside diameters, so they would align with the higher level of the base rings when the wedding exchange occurred.
These projects were challenging, though ultimately extremely satisfying. It was gratifying for everyone involved to take a client’s concept sketch and create an object that fulfils his mandate and still leaves room for creative input from myself and the team that helped bring it to fruition.
 [9]Llyn L. Strelau is the owner of Jewels by Design, a designer-goldsmith studio in Calgary established in 1984. His firm specializes in custom jewellery design for a local and international clientele. Strelau has received numerous design awards, including the American Gem Trade Association’s (AGTA’s) Spectrum Awards and De Beers’ Beyond Tradition—A Celebration of Canadian Craft. His work has also been published in Masters: Gemstones, Major Works by Leading Jewelers. Strelau can be reached via e-mail at designer@jewelsbydesign.com[10].
- [Image]: http://www.jewellerybusiness.com/wp-content/uploads/2014/05/FUTURE-PERFECT-open-1.jpg
- [Image]: http://www.jewellerybusiness.com/wp-content/uploads/2014/05/FUTURE-PERFECT-client-concept-sketch.jpg
- [Image]: http://www.jewellerybusiness.com/wp-content/uploads/2014/05/FUTURE-PERFECT-CAD-model-construction-details-with-captions.jpg
- [Image]: http://www.jewellerybusiness.com/wp-content/uploads/2014/05/FUTURE-PERFECT-bottom.jpg
- [Image]: http://www.jewellerybusiness.com/wp-content/uploads/2014/05/DSC_4067.jpg
- [Image]: http://www.jewellerybusiness.com/wp-content/uploads/2014/05/DSC_4068.jpg
- [Image]: http://www.jewellerybusiness.com/wp-content/uploads/2014/05/DSC_4065.jpg
- [Image]: http://www.jewellerybusiness.com/wp-content/uploads/2014/05/FUTURE-PERFECT-wedding-bands-photo.jpg
- [Image]: http://www.jewellerybusiness.com/wp-content/uploads/2015/11/Llyn-Strelau-e1447864674717.jpg
- designer@jewelsbydesign.com: mailto:designer@jewelsbydesign.com
Source URL: https://www.jewellerybusiness.com/features/future-perfect-love-takes-an-interstellar-journey/