Rethink, reuse, recycle: Giving new life to hand-me-down gems
by emily_smibert | May 3, 2017 2:02 pm
 [1]
[1]By Llyn L. Strelau
Everything old can be new again! I know we all love to design and sell brand new gems and jewellery, and help our clients build their collections of fine jewels. But our clients will often bring in items which they wish to recycle or reuse. Whether an inheritance from a friend or family member, or a piece that’s lost its original purpose due to divorce or widow-hood, it’s up to us to find the best way to give it new purpose.
A diamond is forever… right?
Diamonds are the best candidates for a long and happy tenure in a piece of jewellery, and are usually in good condition for re-setting. Unless they have structural flaws or razor-thin girdles, it is pretty much impossible to damage one. Other ‘used’ gemstones may be in less-than-pristine condition, and thus a frank discussion with the client is needed to determine if sentiment overrules reality, and whether the stones can (or should) be worked with.
Worth its weight
Besides gemstone quality, the other issue faced in re-design is what to do with the metal (gold, silver, or platinum) the client provides. It could be the setting from a heritage gem they wish to re-set or their stash of half earrings, broken chains, or gold dental crowns!
Usually, we will weigh the scrap and use it as a gold credit towards the new project and recoup the value next time we have any refining done.
Many years ago, I would combine a client’s scrap gold on the soldering block and melt it into a blob, then poke and prod it with my soldering pick until I had a quasi-realistic nugget form that could have a bale attached for a pendant. Thankfully, I haven’t had to make one of these in a long time.
 [2]
[2]Trend or timing?
Recycling is perhaps more common in periods of economic slumps and job layoffs—the times when clients might prefer to re-work old jewellery, rather than purchasing brand new pieces.
Unfortunately, in recent years, it is easy for our clients to source gemstones and finished jewellery through online, discounted sources. Often, the quality is not what they anticipated and jewellers are stuck with attempting repair or re-setting gems not purchased in our shops, and therefore, do not provide any income to us.
When to say ‘no’
Some jewellers gently refuse to set gems they did not supply. However, I treat these situations on a case by case basis. If the gems were family heirlooms and have great sentimental value, or were perhaps acquired as a memento of a vacation, I will usually work with them.
On the other hand, if it’s obvious the client purchased a stone purely because they were too frugal to pay a fair retail price, the situation becomes more complicated. Aside from not making money on the sale of the gemstone, I’m also taking responsibility for setting the gem with no vested interest.
Cover your bases
Of course, no jeweller sets out to deliberately damage a client’s gem, but accidents do happen. If a client’s stone is heavily included or is cut with a thin girdle, sometimes discretion is the better part of valour, and the job should be refused. It’s better to decline the job if there are any concerns.
Sometimes it’s necessary to take the job anyway; perhaps business is less than brisk, and there are shop expenses to meet. It’s possible to add a premium to the price quoted, and try to cover some of the lost revenue. An ‘insurance’ fee can also be added. This charge reflects a percentage of the appraised value of the gem, and will help cover any potential problems during fabrication. Plus, it can be a form of self-insurance if the proceeds from these fees are kept in a separate bank account. By letting these funds accumulate, one would not be entirely out of pocket if there was ever an unfortunate occurrence.
 [3]
[3]Rethinking sentiment
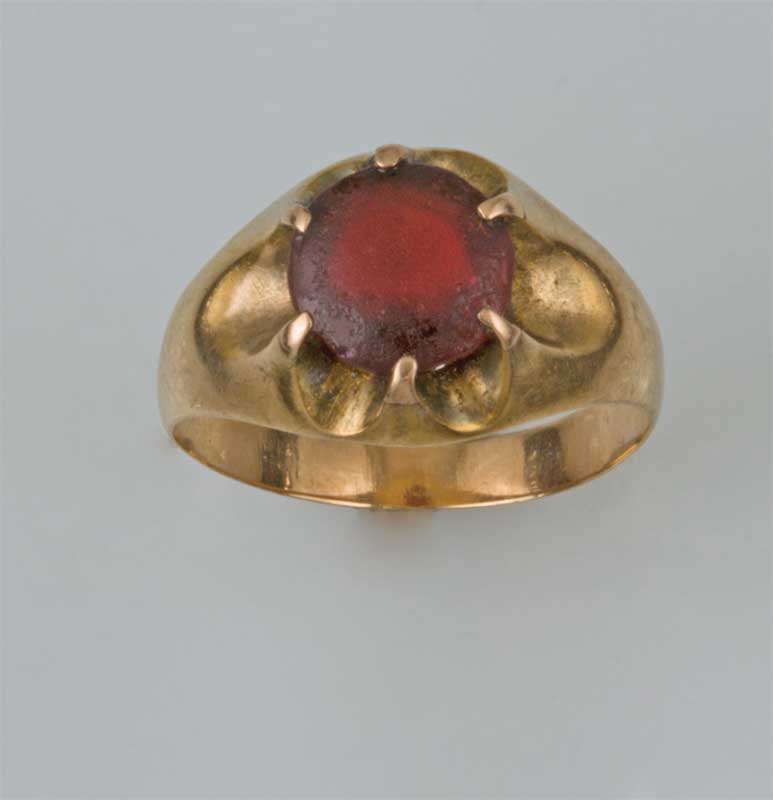
If sentiment dictates the redesign, I will try to re-use a ring or earring in its original state. A current example is the ring show here. This is a work in progress so I will describe the process I chose to use. The ring initially belonged to my client’s grandfather, then his mother, and eventually it passed down to him. It shows its wear and love, and my client has fond memories of the ring on both his
grandfather’s and mother’s hand.
The ring is only 10-karat gold, worn practically to nothing, and the crown of the garnet has been obliterated by wear.
Monetarily, the ring is virtually worthless, but in terms of sentiment, it has immense value. This naturally provoked a lengthy discussion of the pros and cons, the best path of action, and a way to balance sentiment, cost and practicality.
My suggestion was to remove the garnet, as the claws all need to be built up in any case. Since the crown is shallow and worn, I recommended simply polishing the top to create a buff-top stone. It could be re-faceted (at a far greater cost), but the resultant reduction in the diameter would leave a stone ruining the proportions of the ring. If the ring had been in better condition, another option would simply be selling the 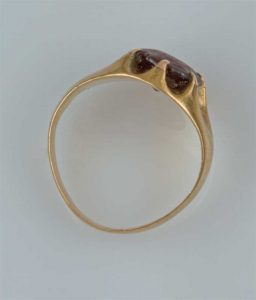 [4]client a new garnet, but this would cost roughly the same as the polished crown and negate the sentimental value.
It would be easy to recreate the simple style of the gold ring and cast a new one, but we would have to add at least three times the weight of gold in order to have enough to make a ring of any substance, defeating the purpose of our efforts.
Since the new ring is to be worn on the client’s little finger, it would need to be increased by approximately four sizes. The original ring is far too worn and thin to be wearable, so we will make a new gold liner that’s 1.5 mm (0.06 in.) thick, and contoured to follow the shape of the underside of the crown. We will increase the width of the sides and bottom of the shank, and size it to his finger. Then we will size up the original ring and slip it over the liner, and soldered the two together. This will keep the original ring visible and the liner will provide the necessary stability to allow for the next generation of wear.
If the ring had been more substantial near the top—rings typically show more wear on the bottom of the shank—we could have simply done a 3/4 shank on the ring, but there was just not enough bulk for this to be possible.
The maker’s hallmark on the inside of the ring and the ‘10K’ indication was hand-engraved, rather than stamped. I offered to excise the maker’s mark and insert it on the inside of the new liner, but the client decided that detail wasn’t critical, so we will just stamp the finished ring with our hallmarks.
Once the liner and ring are assembled, we will rebuild the claws and set the newly polished garnet. The client’s ring will now retains the ‘spirit’ and substance of his ancestor, and can be worn with pride for many years
to come.
 [5]Reuse & recycle
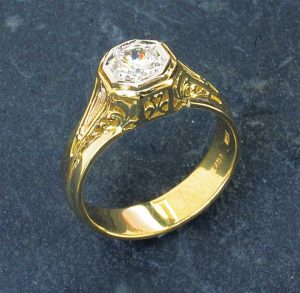
A related project involved a more intricate art deco-style platinum and diamond ring. When rings like these were made originally, they were all done by hand. Two thin sheets of metal were cut and pierced to become the main part of the ring, soldered together at the sides and bottom, and the top section was bent out to form the space required to hold the centre stone. Triangular sections were crafted and inserted to fill each shoulder, and finally, the hexagonal plate was attached to the top. This method was used rather than casting because it would have been difficult to achieve the delicacy of the hand-pierced detail with the available technology and platinum was rare and expensive.
A ring came in for restoration after years of wear. This ring retained its original centre diamond, which required a new top plate, re-setting, and millegrain frame. The shoulder diamonds and bezel-set side diamonds were still secure with a little refreshing, but the shank was badly worn down. I was able to apply a heavy 3/4 shank and touch up the piercing where the new shank was joined. The final stage was to hand-engrave the sides of the shank, replicating the motif that was barely visible on part of the original band.
 [6]
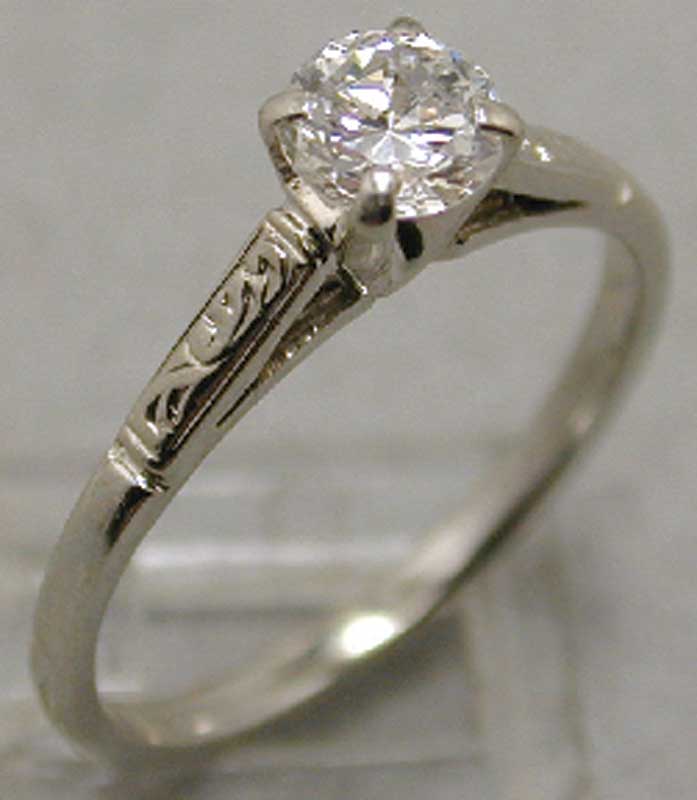
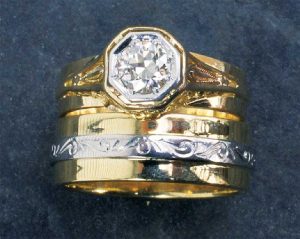
[6]I had a client come in and ask us to restore her grandmother’s vintage diamond solitaire, so she could wear it as her engagement ring. She also wished to have a wide wedding band that would look good with the solitaire and also be attractive worn alone. The diamond ring’s shank was typically worn to a sliver. We could have done a full shank, but then the wedding band would have to have been fitted to its irregular contour. To kill two birds with one stone, we made a pipe-style liner band the width of the widest point of the solitaire, which was sized and slipped over the liner, and soldered in place. This provided reinforcement for the solitaire plus a straight edge to fit against the wide yellow gold band. To further complement the antique ring, we added a central overlay of platinum, the hand-engraved motif inspired by the scroll design on the side of the diamond ring.
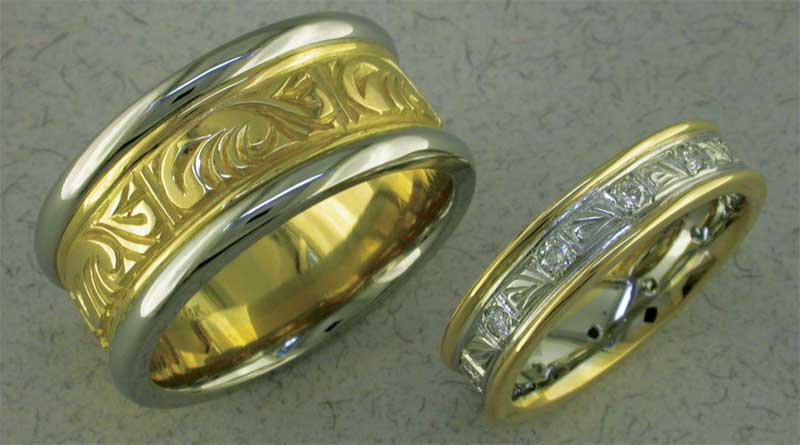
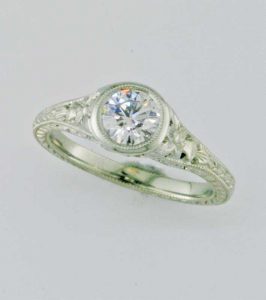
Another client brought in a similar ring from 1920-30, that had originally been cast rather than hand-fabricated. This ring was salvaged from a scrap pile intended to be sent for refining. The top and shoulders were in reasonable condition, though the shank was severely worn. The shoulders had a floral motif—probably orange blossom, a popular wedding flower of the era—flanked by wedding bells.
As before, we did a 3/4 shank, beefed up the thickness and width as much as possible, and had our hand-engraver restore the detail around the shank.
We then made a rubber mould of the ring, and over the years have since sold several variations using this as a base. As you can see from the two images, it was possible to modify the top of the ring to hold a range of gem shapes and sizes. In one case, we inserted a round plate and bezel set a brilliant-cut diamond, complete with millegrain, and in the second case, the ring was modified to accept an octagon emerald showing the versatility of this vintage style.
Value in vintage
Over the years, many beautiful antique stones have been re-cut to modern brilliant proportions in order to ‘improve’ them.
Fortunately, however, appreciation for these vintage cuts has grown, and they are now valued for their antique beauty. This is best illustrated by the recent popularity of modern cushion-cut diamonds—although the machine-like precision of ‘new’ cushion cuts have lost the subtle beauty of a genuine antique cut with its inherent asymmetry.
One of my customers once purchased a large antique cushion-cut diamond that had been previously set in a ballerina-style ring and was surrounded by baguettes. She loves large, contemporary rings, so her new, 18-karat yellow gold ring presented the main stone in a partial-bezel setting with a mirror polished surface under the stone. The baguettes were channel-set all the way around the band, making good use of the graduated sizes.
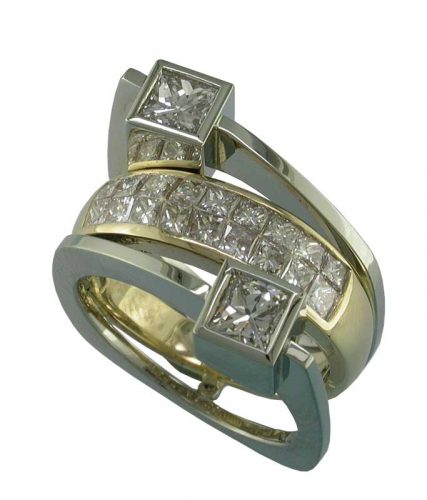
Another customer brought me a ring and a pair of plain princess-cut diamond earrings, and requested a new ring. The original ring contained a double row of small, invisibly-set princess-cuts diamonds. The quality of the setting was suspect and I was afraid to even put it in the ultrasonic, let alone recommend frequent wearing for fear of stones falling out.
Re-setting the 18 diamonds in a new ring wasn’t practical, so I suggested adding to the ring to strengthen it. First, we built up the channel walls, and then crafted two new side plates and bezel-set the two diamonds. The side bands and substantial bezels provide structural support and protection for the original ring, and will prevent any stress on the fragile invisible setting.
 [7]
[7]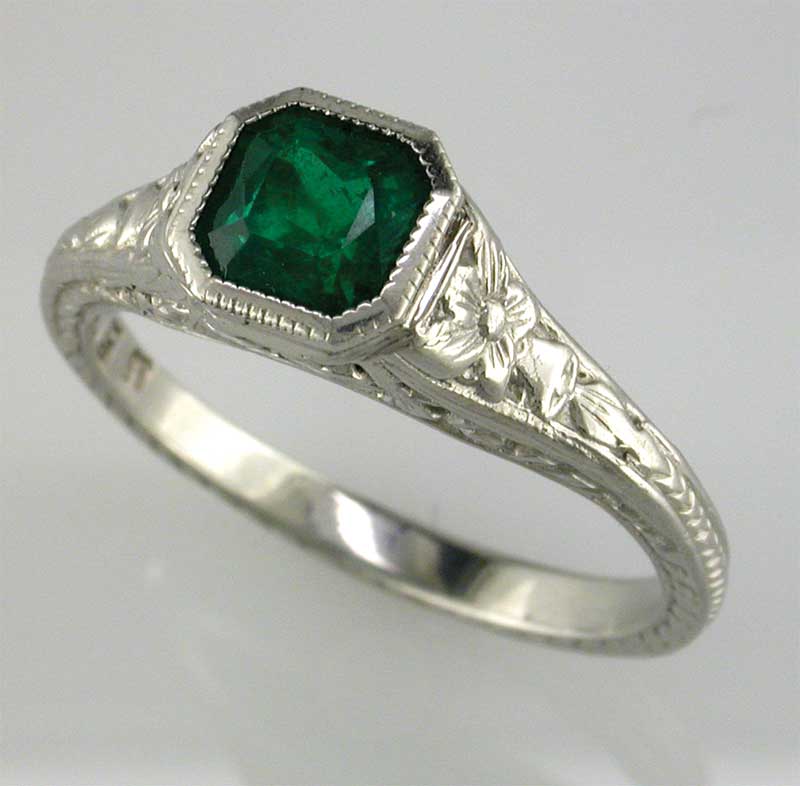 [8]
[8]
 [9]
[9]Brooch the situation
Clients will often come to me with a collection of small diamonds from older pieces that are out of fashion or broken. If the stones are a random mix of sizes, there are several possibilities for giving them a second life.
A simple ribbon of gold bent and given a slight twist creates a versatile möbius strip-inspired form that can accommodate a number of stones of different sizes. They can, of course, also incorporate coloured gemstones, pearls, or an accent of small diamonds pave-set on the edge.
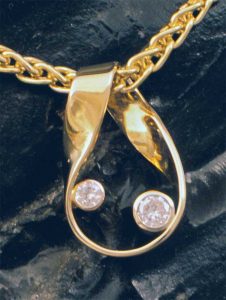
Another popular design is an inverted question-mark shape with different sizes of bezel-set stones soldered together in a pleasing, but random, arrangement appearing to float in the negative space.
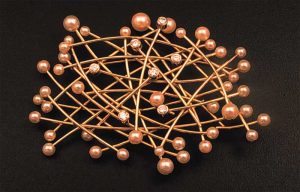
Once, a client’s strand of classic small graduated akoya cultured pearls was sentimental, but rarely worn, and she wished to give them new life. I came up with a contemporary brooch/pendant redesign by creating a nest, of thin, yellow gold wires with the pearls attached to the ends of the wires. We accented the piece with a scattering of small bezel-set diamonds taken from one of her rings. The pin’s back was curved, making it inconspicuous so she can also slip a gold chain through a loop to wear the piece as a pendant. There were enough pearls to make matching pair of earrings to complete the set, too.
 [10]
[10]It’s always fun to renew antique pieces and update their design as jewellery, for me, it is primarily about sentiment rather than purely financial prosperity. But, if approached properly, it is possible to achieve solid margins, too.
Llyn L. Strelau is the owner of Jewels by Design in Calgary. Established in 1984, his by-appointment atelier specializes in custom jewellery design for local and international clientele. Strelau has received numerous design awards, including an American Gem Trade Association (AGTA) Spectrum Award, De Beers’ Beyond Tradition—A Celebration of Canadian Craft and twice winner of the German Award for Jewellery and Precious Stones Idar-Oberstein His work has also been published in Masters: Gemstones, Major Works by Leading Jewelers. Strelau can be reached via e-mail at designer@jewelsbydesign.com.
- [Image]: https://www.jewellerybusiness.com/wp-content/uploads/2017/05/princess-cut-combination-assembled-ring.jpg
- [Image]: https://www.jewellerybusiness.com/wp-content/uploads/2017/05/restored-diamond-solitaire-with-scroll-design-shoulders-matching-wedding-bands.jpg
- [Image]: https://www.jewellerybusiness.com/wp-content/uploads/2017/05/garnet-and-gold-ring-before-restoration-top.jpg
- [Image]: https://www.jewellerybusiness.com/wp-content/uploads/2017/05/garnet-and-gold-ring-before-restoration-side.jpg
- [Image]: https://www.jewellerybusiness.com/wp-content/uploads/2017/05/deco-ring-with-wide-under-shank.jpg
- [Image]: https://www.jewellerybusiness.com/wp-content/uploads/2017/05/deco-ring-with-wide-udner-shank-and-matching-wedding-band.jpg
- [Image]: https://www.jewellerybusiness.com/wp-content/uploads/2017/05/flower-and-bell-motif-ring-with-diamond.jpg
- [Image]: https://www.jewellerybusiness.com/wp-content/uploads/2017/05/flower-and-bell-motif-ring-with-emerald.jpg
- [Image]: https://www.jewellerybusiness.com/wp-content/uploads/2017/05/mobius-pendant.jpg
- [Image]: https://www.jewellerybusiness.com/wp-content/uploads/2017/05/graduated-pearl-necklace-repurposed-as-brooch-pendant.jpg
Source URL: https://www.jewellerybusiness.com/general/rethink-reuse-recycle-giving-new-life-to-hand-me-down-gems/